**Warning: Long and image-heavy post ahead**
A new fashion exhibition has just opened up at the Daughters of the American Revolution museum here in DC, ‘An Agreeable Tyrant’: Fashion After the Revolution. It explores Americans’ various relationships with prevailing fashions during the early Federalist period of 1780s to 1820s. Over the past year I’d been assisting the curator, Alden O’Brien, with the exhibition. First, with some late-stage planning and design, then with drafting scaled down patterns of several of the garments going on display, a little bit of photography, and finally mounting the garments on their mannequins including making adjustments to the mannequins themselves and also making some of the underpinnings needed to properly display the garments. Most of this was on a volunteer basis but I also wrote one of the essays for the catalogue (on fashion and thrift) and that was on a professional level. It was very exciting for me because its the first time I get to see my name in print this way!

FYI: The exhibition runs until April 29, 2017 and the catalogue is available to purchase online here – and they do ship internationally.
One of the really fun things about the exhibition is that it’s not located in the primary exhibition space; rather, it’s spread throughout the museum’s series of period rooms, a number of which are decorated for dates that correspond more and less closely to the dates of the fashions displayed therein. This creates something of an in situ feeling that helps position the garments within a broader social context and also heightens the visual interest of the clothing while enlivening the period rooms themselves.
The exhibition has something like 50 dressed mannequins of men’s and women’s historical clothing from the 1780s-1820s, includes undergarments and outerwear in addition to dresses and suits and ranges in status from fairly humble to very elite; it covers a great spectrum!
As I mentioned, one of my activities was drafting scaled patterns from several of the garments on display. These were mostly dresses, which were are wonderful in their individual ways but my favourite piece to do was a little wee vest like a sleeveless spencer from c.1800, it is to-die-for chic!
Seriously, just check out this fabulousness:


Here’s the full ensemble:

That popped/standing collar! Those little buttons! That little pleated peplum at the back! I just HAD to have one!
In fact, I loved the whole ensemble (dress, vest, bonnet) so much that I was determined to reproduce it in time for the exhibition’s opening.
And I did.
The Dress
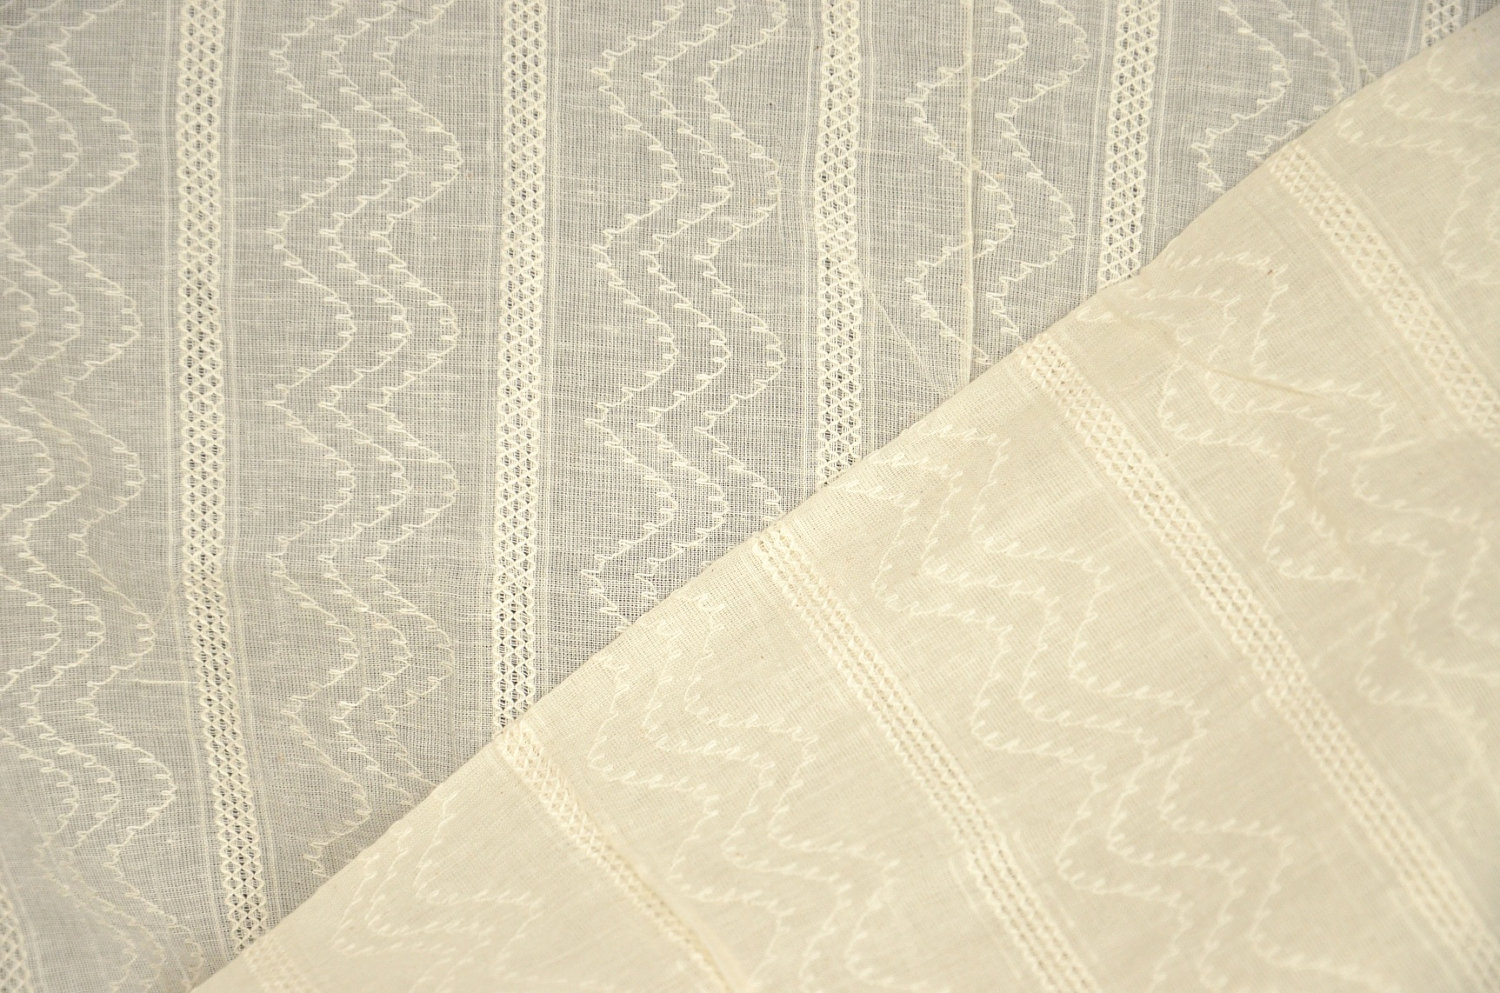
I started off looking for appropriate fabric since that was one of the features that really drew me to the original dress. It’s not that easy to see in the photos above, but here are a couple of close-ups of the dress fabric:


I just loved the woven serpentine pattern, I hadn’t seen anything quite like it before.
Now, I didn’t expect to find anything exactly like it, I was hoping to find something just vaguely similar. So imagine my delight when I found this fabric on etsy:
Sure, it’s not even close to the same as the original but it’s far more evocative of it than I expected to find and very pretty in its own right. And bonus points – it’s unbleached cotton so the colour is quite close to the original dress (which may or may not have yellowed over time, I’m not sure) and it’s made in India as I’m sure the original dress fabric was!
Although it’s not in the catalogue I drafted a scaled pattern of the dress before it got mounted for display (one of the perks of having behind-the-scenes access to this kind of collection!). However, to save myself some time I didn’t actually enlarge all of the pieces. Instead, I compared the bodice back/lining and sleeve pieces with those used for my 1797 dress from Norah Waugh’s Cut of Women’s Clothes and saw they were very similar in shape apart from the shoulder and side back seam placements. So I simply traced them out with slight alterations to more closely resemble the seam lines of the DAR dress. The front of the dress, from gathered neckline to hem, is all one piece that is mostly rectangular with a curved upper edge for the neckline. This piece I did enlarge so I could make sure I got the neckline curve as close as possible. I also enlarged the skirt side and back pieces since the side is a triangular gore with curved hem and the back, while also mostly a rectangle, has the curved hem/train.
I didn’t take photos of the dress in-process, but here are some detail shots of the construction:

I modified the type of bodice seam construction of the original:

to lapped seams, just because I really like them

The neckline is gathered by drawstring and the casing actually runs almost all the way round, from shoulder seam to shoulder seam.
It’s just the neck edge folded under twice to about 1/4″ and fell stitched from the underside.

You just push the fabric to gather as much as you want to and distribute how you like. The drawstring casing is open at centre front to pull and tie the strings.

Bodice interior overview. I had to piece fabric at the bodice lining fronts because I slightly misjudged something (I’m still not sure what). But it’s totally historically accurate to do so!


I wanted cleanly finished armholes and found the easiest way was to fold the fabric edges in towards each other and do a spaced whipstitch around. Unfinished edges are still historically accurate at this point but clean finished ones started appearing in the 1780s and were becoming common by the turn of the century. I can’t remember any specific examples at the moment but I feel like I’ve seen this method used on at least one original garment. And if I’m wrong, oh well. I like how this looks.


The skirt seams are sewn with a mantuamaker’s seam (here’s a tiny tutorial on it)

And the hem is a 1 1/4″ fold that is folded under 1/4″ and running stitched all the way round.

The Vest
The vest was made from a scrap piece of silk in my stash. The colour is more blue-green than the original, but again, I felt it was quite evocative of it and it’s also a better colour for me than taupey shade. While the scaled pattern for the vest is in the catalogue I cheated slightly and traced the full-size pattern I took directly from it. It was a little on the small side for me so had to alter it a bit, but it’s such a simple, small pattern that that was pretty easy.
Again, no in-process shots, but here are some showing construction:

The only part that’s lined is the centre back piece and it requires only a small scrap of fabric.


And here’s how it looks from the outside:


The original vest has a very narrow woven cored (silk or cotton) tacked around all the edges and over all the seams. I couldn’t find anything quite like it and was getting concerned about what to do. Then I remembered I have quite a lot of ecru-coloured No 8 cotton perle for a tablecloth I’m embroidering (don’t expect to see that soon, it’s taking several years to get through! lol). I took 3 strands, twisted them and tacked it down as a cord. It’s not the same kind of thing as the original, but from any sort of distance you can’t tell a difference.

The buttons were something new for me. I could tell they were thread button but not Dorset ones. After a little researching via google searches I found out they’re called Yorkshire buttons (here’s the tutorial I used to make mine). They’re made very similarly to Dorset buttons only in such a way as to come free of the base, get stuffed with a little batting, and drawn closed on the underside. With just a little smooshing and shaping they easily take on the slightly pointed dome shape similar to the original buttons.
The originals have something harder in them, I’m not sure what, some kind of wood form perhaps. They are also a little smaller and made with finer thread. I decided to use more of my perle cotton for both consistency and speed – I did have to make 20 of them, after all!

One mistake I made was not altering the back/side back seam lines to match up with the pleats of the peplum after I enlarged the vest to fit me properly. Oops. It bugs me a little but not overly and there’s not much I can do about it now!

I do love these buttons – now that they’re all finished!

I hope other people will take to this vest like I have, I would just LOVE to see more versions of it! I think it’s a great piece for either beginners or those looking for something that’s quick but also a real showpiece.
The Bonnet
This was a total last-minute make. I had hoped to buy or make an actual straw one, but that didn’t pan out in time so I had to improvise. I had a scrap of buckram just large enough to make a similarly shaped brim to the original bonnet and used scraps of a taupe/brown silk taffeta in my stash (actually, it’s leftovers from this). For the crown I just made a tube of fabric to fit around the inside edge of the brim and gathered it at the top. I had bought some vintage/antique brown silk satin ribbon to trim what I’d hoped would be a straw bonnet, replicating the bows as best I could (though I shortly after discovered how I could have done them better). Unfortunately, I ended up making my bonnet just a little too small so the shape is off a little from the original and I keep feeling like it’s going to fall off. But it’s pretty cute nonetheless and works well enough.
Incidentally, Taylor of Dames a la Mode (who provided jewellery and hairstyling for several of the mannequins, making them look even more fabulous!) took a fancy to the yellow spencer ensemble displayed with the vest ensemble and decided to copy it. She had just the perfect yellow silk taffeta in her stash to do it, too!
We went into the DAR shortly after the exhibition opening and got to have our picture taken with our “ladies”

We then took advantage of some spectacular architecture inside and outside of the DAR for a photoshoot! I owe a big Thank You to Taylor for getting so many great shots! Especially since she was feeling under the weather that day, such a trooper!


Jaw dropped! Eye popped! WOW!!! I have never seen that kind of vest before. Thank you SO MUCH for sharing the images and the link for the DIY buttons!! And to see you make your own… Inspiring! I’m excited to order the book!!
LikeLike
Thank you so much! I hope you enjoy the catalogue – there’s so much more to get out of it than just the vest pattern!
LikeLike
Wow, what an amazing ensemble! I always love what you make, but I think you’ve excelled yourself with this one.
LikeLiked by 1 person
Wow, thank you!
LikeLike
This is truly stunning. I love seeing the pics of the construction. Isn’t DAR just the most spectacular setting for period pics?
LikeLike
Thank you! And yes, spectacular setting is right! It’s also nice that it’s not too public, so not too many people to give you funny looks, lol.
LikeLike
When I saw the “An Agreeable Tyrant” exhibit, this vest is what intrigued me the most and I’ve vowed to try to recreate it. I did not purchase the book however, so I don’t have the pattern, but I may be rethinking that decision now. You did a stunning job with it.
LikeLike
It’s the piece that most struck me as well, love and fascination at first sight! I absolutely insisted the pattern had to be included in the catalogue (not that there was much resistance to it in the first place, lol).
LikeLike
I love the dress so much. And thank you for the blog post. I am trying to see how the front skirt openings work and the tie round the front of the dress . Is there a a diagram or a picture somewhere?
LikeLike
The dress has no opening. The front is a big piece of fabric that is gathered only at the neckline with a drawstring. It slippes on over the head. The band is attached to only one side of the bodice and is pinned around on the other side. That’s it! Easy-peasy!
LikeLike
The picture of the dress ‘open’ (?) has me confused.. Just above ” I wanted cleanly finished armholes”. Or is the dress just inside out with the lining pieces flapping .making it look like the dress was open? And is the band just the cross over to the other side of the underbust? not a tie at all?. I just love this dress sooo much!!
LikeLike
Ah, yes, the dress is inside out for those photos – sorry, I probably should have specified that. So what you’re seeing is the bodice lining, which pins closed at the front. The dress fabric is separate from the lining at the front, gathered up only at the neckline, and the fullness held in by the fabric band under the bust. The band is stitched to one side of the bodice side front (at the point where the lining and dress fabric are still attached to each other) and pins on the other side front. The original dress has 2 ties, each one is stitched to a side front, and they overlap across the front. I’m not 100% sure how they were fastened, you could tie them but they’re pretty short so might look funny, or I guess you could pin them or perhaps use some kind of buckle. We were unsure how they were used so just pinned them invisibly for mounting on the mannequin for the exhibition.
Hope that helps!
LikeLike
Ta da!!thank you!!
LikeLike
Lovely outfit and what a fun opportunity you had to contribute to the exhibition! I might need to make a dress like this–I’ve had fabric for years but not the time. When I do, I will certainly be referring back to this post for some of the little construction and patterning details you mention. 🙂
Best,
Quinn
LikeLike
Thank you! It was a really fantastic opportunity – both fun and good for my CV! The dress is a really great design – relatively simple, very comfortable to wear, and looks great!
LikeLiked by 1 person
Oh my goodness! What a spectacular and lovely ensemble you have created. The fabrics are simple and the buttons that you made are divine! Thank you for sharing your beautiful process of the gown and the the vest.
LikeLike
Thank you very much! And thanks for stopping by!
LikeLike
Slightly belated, but OMG I LOVE that vest!!! The dress is lovely too, of course, and thank you so much for the closeups of the lovely fabric—I have some cotton with a woven-in textured stripe I had been thinking would be fun for a Regency style dress, but I hadn’t actually seen much that made me think the woven-in pattern might be historically plausible—I am excited. But the VEST! That I could wear every day. It’s adorable!
LikeLike
“It was very exciting for me because its the first time I get to see my name in print this way!” Many congratulations!
LikeLike
I came to the DAR just before Christmas- how wonderful! I just loved all the displays. And I am definitely up for copying one of ‘your’ dresses. Another question about the dress you have documented here: roughly how long around the hem all up of the dress? And if you tucked the train in to your legs, how far out on the floor does it come? You can see than imitation is the sincerest form of flattery!!
LikeLike
Thank you for all the help you gave me on Saturday! From the moment I saw this vest, I knew I had to try making one. It is so adorable! Could you, please, tell me how you attached the collar?
LikeLike
Hi Tammy!
I just had a look at it. So, it’s cut so that the upper edge is on the fold. It looks like I first folded the collar in half right sides together and sewed the ends then turned it right side out. I then sewed the outer side to the neck edge with either a back stitched or tight running stitched seam. I folded under the seam allowance of the inner side and sewed it down along that seam line with a hemming stitch to enclose the raw edges. Does that make sense?
LikeLike
Pingback: A mental meh and a very-end-of-the-18th-century muslin gown - The Dreamstress
Pingback: Little Red Spencer-ette - The Dreamstress