As promised, a post outlining the construction of the 1780s mint wool redingote I made at the end of last year.


I largely used the 1/8 scale pattern of this mid-1780s redingote published online by LACMA as part of their pattern project, which is free to download here!

My fabric was a delicious suiting weight mint green wool twill that I lucked out on during a fashion fabrics club sale (I generally feel a little iffy about FFC since I’ve had mixed experiences with them over the years but that time it worked out beautifully!). I used white linen to line the bodice and a gold-ish silk taffeta from the stash to line the sleeves.
After scaling up the pattern (which I did manually using 1″ gridded drafting paper) I made a mock-up of the bodice lining for fitting and size alterations. Luckily for me, it wasn’t that far off so I only needed to make minimal alterations to the pattern – yay!
I first cut the bodice lining – sorry, no photos of the process of this! I backstitched the centre back seam then made lapped seams for the side back and side seams; I left the shoulder seams un-sewn for the time being.
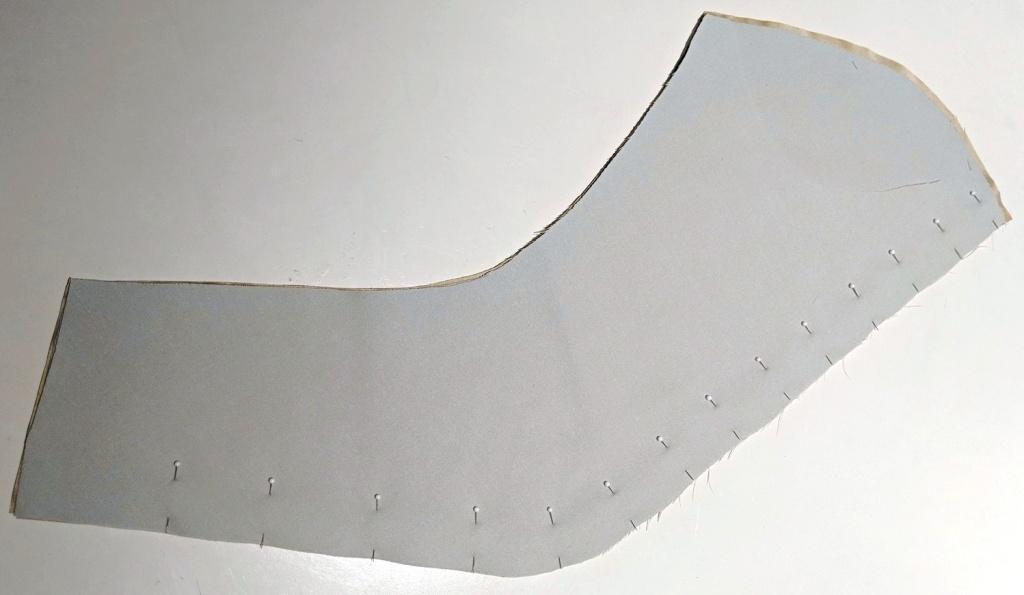
Once that was done I used the bodice back lining pieces to cut the redingote back directly on the fabric:

The bodice back and side back pieces are meant to be cut in one with both the skirt and each other.

The space between the pieces is for pleats in the skirt

What you see in the photo above is the full skirt, 2 widths of 60″ wide fabric. The length was determined by measuring over the split false rump worn under the redingote, mounted on my dressform. I also added length at the back for a little bit of a train.

I forgot to take photos of the bodice back construction process so the photo is jumping ahead a bit.
However, it’s pretty straight forward. The centre back seam of the bodice was back-stitched, right sides together. The centre back seam of the skirt was running stitched, right sides together. The side back and side seams are lapped and sewn with spaced back stitches the size of prick stitches. I continued to leave the shoulder seams unsewn.

Then came the scariest part: slashing the waist of the side back to pleat up the skirt.
It’s faint to see but I first drew the lines in chalk:

then cut along the top/main line:

and finally trimmed off the resultant corner to create a smoother curved line for the skirt:

The most fiddly part of the entire process is that first pleat at the junction of bodice and skirt – getting the right angle and keeping the puckering to a minimum. I didn’t achieve 0% puckering in the end but it’s not noticeable from any real distance, thankfully.

I pin-basted the skirt to the bodice waist to check the hang of everything and had to make small modifications to the pleat angle multiple times to get it to where I liked it – not fun! When I was finally ready to sew it all down I did it with a backstitched seam from the inside. And I took a break from it all before continuing the other half of the skirt.

Once the skirt/waist seam was all dealt with I started on the collar.

I backed the collar pieces with white linen to add just a little body to the wool to help it lay smoothly. I cut away the seam allowances of the linen backing along the sides and bottom (non-neckline) edges.

I pressed down these outer seam allowances and then basted them to the linen backing.

Making it look nice and clean on the outside:

The collar is self-lined/faced and finished by turning under the seam allowances of this and hem-stitching it to the wrong side of the collar.

Then it was onto the collar stand, which I backed with heavier linen canvas to help it stand up from the neckline of the garment.

I basted the collar to the linen canvas backing of the stand…

and hem-stitched it through all layers on what will be the underside once it’s sewn to the redingote neckline.

I finished the collar stand in the same manner I did the collar, with and applied facing.
The collar stand is sewn to the neck edge with a lapped and spaced back stitch seam and then the neck edge of the bodice lining was folded over the inside of the collar stand and hem stitched all around in the same manner as the collar facing:

Here’s how it looks on the redingote:

Then it was on to sleeves, which did end up turning into sleevils but that was really my own fault.
They are 2-piece sleeves on which I used the same seaming method as on my striped silk open-robe from earlier in the fall.
These are different from the sleeves of the LACMA redingote because I wanted them full-length and also really wanted to try out the nifty-looking funky cuff style that was popular at the time (see below).
I started by layering the two wool pieces right sides together and then layered both pieces of the silk taffeta lining, so it looks like this from one side:
and like this from the other side – with 4 layers total here, pinned along the first seam I planned to sew:

After pinning the layers together to match up the edges I turned up the hem allowances on all 4 pieces:


I then sewed a back stitched seam through all layers:

I sewed the other seam (the inner curved side here) through only 3 layers, folding the outermost lining layer down and out of the way:

I then pulled that outer most lining layer down….

wrapped it around the other side of the sleeve….

and then hem-stitched it over top of the still-exposed seam, thus enclosing everything:


I finished off by hem-stitching the lining to the wool at the sleeve hems:

Then it was on to the sleeve cuffs, based on this style:

This is not the LACMA redingote, this one is at the MET – but isn’t it crazy how nearly identical the fabrics are!?
Here area few more examples from period images:


This style of sleeve cuff also appears to have been influenced by menswear styles, as is the redingote overall:

I agonized for a while over how to actually make these, being unsure whether they were supposed to be functional or simply decorative – like, how do you make these things functional!? Ultimately, the consensus, based largely on the few extant examples + common sense, suggests these were just decorative, whew! Once that was decided they were much easier to figure out, really just a few layers of appliqued pieces. I used Fractured Fairytale’s post on her (delicious!) redingote as a sort of guide for my cuffs.


Next came the shoulder capes:

These are each finished separately all the way around the perimeter

They are lined with champagne silk habotai, that in retrospect was more sheer than I anticipated. Oh well.

Again, the edges of each layer were turned under and then hem or running stitched through all layers. The capes on the original redingote are apparently unlined but I wanted a cleaner finish for mine, especially since my wool twill probably frays a lot more than the silk of the extant garment.

I then whip-stitched the two capes together at the neckline edge…..

and then whipped them to the neckline of the redingote:

Then it was onto the funny-but-somehow-sophisticated-looking butt flaps.
These are purely decorative and get tucked into pleats in the back of the skirt:

They’re made from 2 layers of the wool with all edges turned to the inside and running stitched around the perimeter. Even though the long straight edge is concealed inside the skirt pleat I still finished it to keep it from fraying and in case it’s ever espied on a windy day!

They are stitched to the underside of the skirt pleat:

And here are the stages of covering the buttons. However, I have since learned it’s best to cut your circles a little smaller than to fully cover the back of the button to enable it to lie flat and unmoving on the garment. I’ll remember that for next time! I am not re-making these buttons!

This redingote has a particularly interesting and enlightening feature, or at least I think so!
Inside the bodice fronts are attached under-bodice fronts that lace up. What I realized is that the bodice fronts of the actual redingote are not supposed to be closely fitted to the body but rather leave a little room for tucking in a handkerchief to help get that pidgeon-breasted front that was popular in the 1780s/90s. The lace-up under bodice fronts are what hold the garment close to the body and you tuck the handkerchief in between those and the outer bodice front! How clever is that!?
Anyway, here’s what the pieces look like on their own:

The edges are finished by double turning under the 1/2″ seam allowance I gave them. The front edges have a larger allowance for turning back into a self-facing for working the eyelets. The front edges are also boned

They were stitched into the redingote, through all layers, like so:

Oh, and because it looks like I forgot earlier, here’s an overview of the finished bodice interior:

The redingote hem is finished with a silk taffeta hem facing, like so:

#piecingisperiod
It was a very crisp and heavy taffeta so I washed it to soften it so the hand would be more similar to the wool. In retrospect this may not have been a great idea as the silk also lost some of the smoothness and was less effective at repelling dirt than it may have been had I let it alone. It fared better than the wool itself – which after a couple days traipsing around Williamsburg’s dirt streets and paths is FILTHY but I may replace it at some point all the same.
The petticoat is made in the usual, straightforward manner of most 18th century petticoats. I used 2 full-width panels of the wool, stitched up the side seams with running stitches leaving openings at the top, pleated the top edges and bound them with linen tape that extends past the fabric to make waist ties:

Next up will be a (much shorter, I hope) post on constructing the hat I made and wore with the redingote!

Lovely!
LikeLike
Thank you!
LikeLike
Gorgeous work. I’ve not had good luck scaling patterns up so I have great respect for your accomplishment in that aspect, as well as your beautiful dressmaking skills.
LikeLike
Thank you! I almost exclusively use gridded paper when scaling up patterns, makes it so much easier! Have you tried that?
LikeLike
Enjoyable read as always! Love those butt flaps, what amazing detail. Are these details derived from mens styles? (Otherwise what crazy person came up with the idea😄).
LikeLike
Thank you so much! The butt flaps do seem to be borrowed from menswear – they resemble coat pocket flaps from the period – but manipulated in such an odd way that I love!
LikeLike
Impeccable work in every regard and inspirational as always! Love your work!
LikeLike
Thank you so much, Ruth!
LikeLike
I just want to thank you again for a) writing all this up and b) helping me so much on figuring out the original parts of my redingote. I just reread this (for the fourth time) before I start construction on mine! 😀 THANK YOU!!!! You are amazing and an utter inspiration!
LikeLike
Thank you so very much for having such detailed progress through each stage of your garment. As a new sewer to historic garments, your step by step process, dialogue and pictures, is so very helpful to me!!!
LikeLike