I will take almost any flimsy excuse to make myself a new, pretty (silk) dress. Most recently, Thanksgiving did the trick. I also decided I wanted to try out a vintage pattern in my stash that’s had me intrigued for some time: MacCalls 6473 from 1962.

(from now on, I’m going to try to take at least one photo of a make from a vintage pattern copying the pose(s) on the cover art!)
For years I’ve vacillated between thinking it looked really cool, and thinking it bordered on frumpy. So what did I finally do? I used one of my favourite pieces of silk from my stash to try it out! (mark down on your calendar the day I post that I actually bought fabric specifically for a project). I made version B, with alterations only for size and proportions. That means I graded it up a size through the bust and waist (I actually deliberately made it a little loose through the waist since the first time I was going to be wearing it was at a big turkey dinner!) while shortening the waist a goodly amount.
And this is how it turned out

If you haven’t noticed yet (and I haven’t completely overstated this) I love fall and I really love fall colours. For the past few years I’ve been all about burnt oranges and rusts at this time of year and 2013 is no exception. I just LOVE the colour of this silk. It’s a dupioni with very little slub; it’s even pretty smooth for a shantung. It’s just such frackin’ gorgeous fabric! It’s also got a very crisp hand, which means the skirt has a mind of its own when it comes to drape, even without the wind helping.

The only issue I have with it is that I believe I’m getting over-zealous with my shortening-through-the-waist practice. This bodice could probably do to be about 1/2″ longer. This would allow the crossover pieces on the bodice front have a little more depth to them, particularly for the narrower ends. One thing I might consider later on is unpicking the front waist seam and folding under those ends 1/2″ – 1″ to make them wider, like the pattern originally has them.

I also made a mistake with how I constructed those crossover pieces. Have I mentioned that I’ve been sewing 17+ years and am still waiting for the project I don’t make a mistake on somewhere? Yeah, well. It’s because I didn’t read the instructions. This is usually not a problem for me, and I usually do read the instructions for something that seems a little tricky (I read and re-read them for my apron! lol). I didn’t think I needed to for this dress. However, it turns out that those crossover pieces are to be finished around 3 edges – top, front edge, bottom – and not just the top and front edge. Meaning they’re not supposed to be sewn into the waist seam like I did.
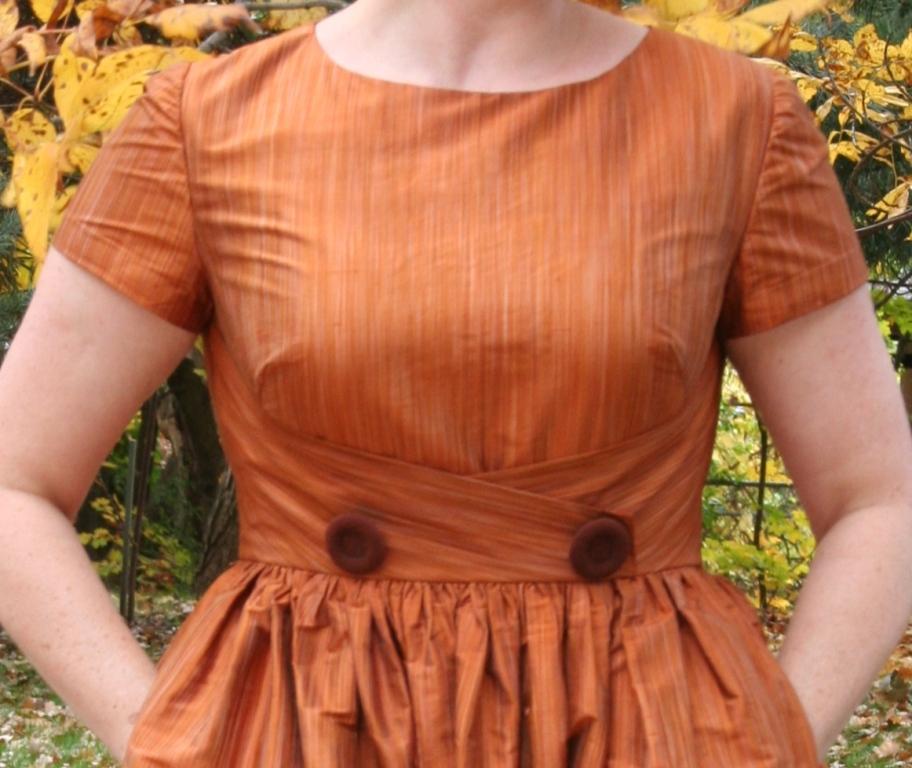
(note to self: if I’m going to significantly crop a photo to get a close-up/detail shot an aperture setting of f.11 is not enough depth of field. But look how nice and crisp those leaves behind my shoulder are!)
Oops. I’m not really bothered by it, though, I think it still looks fine. If I make up this pattern again (I think it would be great in wool for winter and/or in something like cotton piqué and sleeveless for summer) I’ll try it out the way it’s supposed to be done and see which I prefer. Hmm…..now that I’m looking at this I can see that I’ll need to narrow the bodice at the shoulders some more too. I already took off 1/2″ from the pattern, but I think it could use 1/2″ more. I believe this is what is causing the bit of pulling you can see on the left-hand side. Doing this will also give a little more space across which to ease the sleeveheads. There was no way of making these completely smooth with this fabric, but I still don’t care too much. In wool, or even cotton, it should be a breeze. One thing that is niggling is that the left-hand French dart is puckering a bit while the right-hand one is pretty much fine. I can’t tell what I did differently between them, that one dart point just does not want to behave. And about French darts: I know most people love them once they try them, but I don’t. I like to have my bodice smoothly close-fitting and French darts seem best for a looser fit garment. I may be tempted to change this to waist and bust darts, unless I do one in wool, in which case it’ll be fine (wool is SO awesome to sew with)

The back of the dress is plain and simple, I did a hand-picked zipper because special dresses deserve that kind of treatment.

I lined the overlap pieces and the bodice with the same rusted coral silk charmeuse I used to line my 1880s Dolman.

The original instructions don’t have you line the bodice and have facings for the neck and sleeve hems instead. Even though I was adding a lining, I decided to use these facings as well to make everything just a bit nicer and more stable at these edges. For the neck facing I used a tip from a Threads magazine I picked up years ago. I assembled and pressed up the hem of the neck facing, then machine stitched it around the outer edge to the lining before putting the lining into the bodice. Doing this reduces a good amount of the fiddly-ness of putting both the facing and the lining in and it’s really neat and clean looking. I couldn’t do this with the armholes because then I wouldn’t be able to turn it all back right side out…..ok, well I possibly could have used the tailored jacket method to do that but would not have been worth the hassle at all. Instead I sewed the sleeve hem facings on after putting the lining in and then just handstitched the upper edge of the facing.

As per my usual, I kept the selvedges at the skirt side seams. To finish the seam allowances of the skirt centre back I used orange seam binding, and then orange hem lace tape stuff to finished the edges of the pockets and as hem lace.

I do love putting pockets into dress, there’s just one thing I’ve never figured out how to do cleanly:

the cut in the back side seam allowance to enable it to be pressed open. Does anyone know what to do about or instead of this? Is this something really easy that’s obvious and everyone else knows but me? Do you all just press the seam allowances towards the front and not open? I’d really like to not have to keep cutting these notches.
Oh, and the buttons are a pair of wool fabric covered coat buttons I picked…..somewhere……at some time. Very helpful, I know.
Anywhere, here’s a vaguely vintag-y pose to go with the vintage pattern and buttons.

It’s really just me being annoyed with the wind, but I feel like I’ve seen an old fashion photo with a model posing something like this……again, so helpful, aren’t I?
Now the more I look at these photos the more I think I really do need to try out a wool version. I actually have piece of wool crepe in almost the same shade of blue at the on the pattern envelope. Sadly, I don’t have enough of it for this dress. Ah well, I’m not exactly hurting for other options from my stash (oh stash, why can’t I quit you?)
Finally, here’s a close-up of my shoes. They’re from L.K. Bennet and I bought them as a total impulse buy while I was in the UK last Fall/Winter – and I will never regret it! (plus they were on sale at over 1/2 off and so beautifully made)


Beautiful dress (inside and out) and photography!
Sorry, I never figured out how to finish the snip at the bottom of the pocket either. If I suspect that the fabric will fray, I apply a little bit of fray-check there.
LikeLike
Man, why didn’t think of fray check at least before. I’m going to the fabric store this evening, I will add that to the list! At least that’s a lot better than doing nothing. Thanks for stopping by and for the tip!
LikeLike
Great Dress! I have this pattern (and many more) but have not made it yet. I love the colors and you did a fabulous job….
LikeLike
Thanks Eileen! I think it’s neat when you find out that someone else has the same vintage pattern since they’re rarer. This is a fun, I would fully recommend giving it a try!
LikeLike
This is so pretty! What a perfect fall dress =)
LikeLike
Thank you Naomi!
LikeLike
Stunning dress! and your photos are absolutely lovely too 🙂
LikeLike
Thank you Carolyn! (it’s such a novelty typing my own name when it’s not in reference to myself, lol) I’ve very much enjoyed starting to explore your blog – you do lovely sewing and photos!
LikeLike
This is the most gorgeous dress. I love the colour on you and the waist detail makes t so much more interesting. I’d love to try this pattern. Great, informative post thanks.
LikeLike
Thanks Mags! I’m sure you could find a copy of this pattern or something similar without too much trouble. I actually just found 3 listings for it doing a Google image search. (https://www.etsy.com/ca/listing/152229800/misses-and-junior-dress-with-slim-or?ref=market http://cemetarian.com/shopping/pgm-more_information.php?id=2036 http://www.hellowheatridge.com/classifieds/collectibles/) In case you need any enabling, lol ;o)
LikeLike
Wooh ! I love it ! This dress is beautiful… nice job !
LikeLike
Thank you Lujayne, and thanks for stopping by and saying hello!
LikeLike
Wow, what a beautiful dress. That color certainly suits you! I’ve never known what to do about clipping seams below pockets either, but I’ve never ever had one ravel on me, so maybe just leave it as is.
LikeLike
Thanks Rebecca! I think on this silk I should be able to leave it, it’s fairly tightly woven and this dress won’t be going in the wash. But sometimes I do encounter this issue with ravel-y fabric. I’ve never had fabric ravel past the seam allowance, it’s more that I like to try and make the insides of my garments as cleanly constructed as the outside – when that’s possible.
LikeLike
Lovely fabric, lovely dress, and it looks fabulous on you! And your finishing is just so perfect as well – love the lace on the hem.
LikeLike
Thank you very much, Black Tulip! I usually strive for this level of neatness/finishing, but somehow don’t always succeed. It’s nice to have someone notice when I have :o)
LikeLike
He descubierto su blog en pinterest, con un pin para hacer un turbante de regencia. Después he estado mirando todas las cosas que ha creado y me ha encantado.
Todavía tengo que verlo con un traductor, porque no entiendo bien el inglés, pero me han parecido muy bonitas sus creaciones.
Espero disfrutarlo con tiempo leyendo las explicaciones.
Me habría gustado hacerme seguidora del blog, porque veo que en poco tiempo ha puesto muchas cosas y seguro que tiene muchas más para mostrar, pero no veo en el margen derecho la forma de poder seguirla….
Yo también tengo un blog semejante, de recreación, si es tan amable me podría dejar allí la forma de seguirla, si es posible.
Ya le contaré más cosas cuando vea las entradas traducidas.
Mi blog es http://ladymarloleon.blogspot.com.es
Hasta pronto.
LikeLike
Thank you so much for the lovely comment, Lourdes. I hope you’ll be able to see this translated soon. I have a button to follow my blog through bloglovin at the top right of the screen. I’m going to go check out your blog now!
LikeLike
I’m just starting this pattern and based on the informative notes would be very interested to see the photos that go with them but they don’t show. I’ve tries a couple different browsers but no luck. Any way to repost?
LikeLike
Hi there, sorry about that. I’ve re-uploaded the images so they’re all back now! Good luck with your dress!
LikeLike
Thank you so much, you do beautiful work, this will help!
LikeLike
Thank you very much, I’m glad it will be useful to you!
LikeLike