The weekend before American Thanksgiving a few friends and I enjoyed a little jaunt to Williamsburg. We dressed up one day for a carriage ride in the historic district:
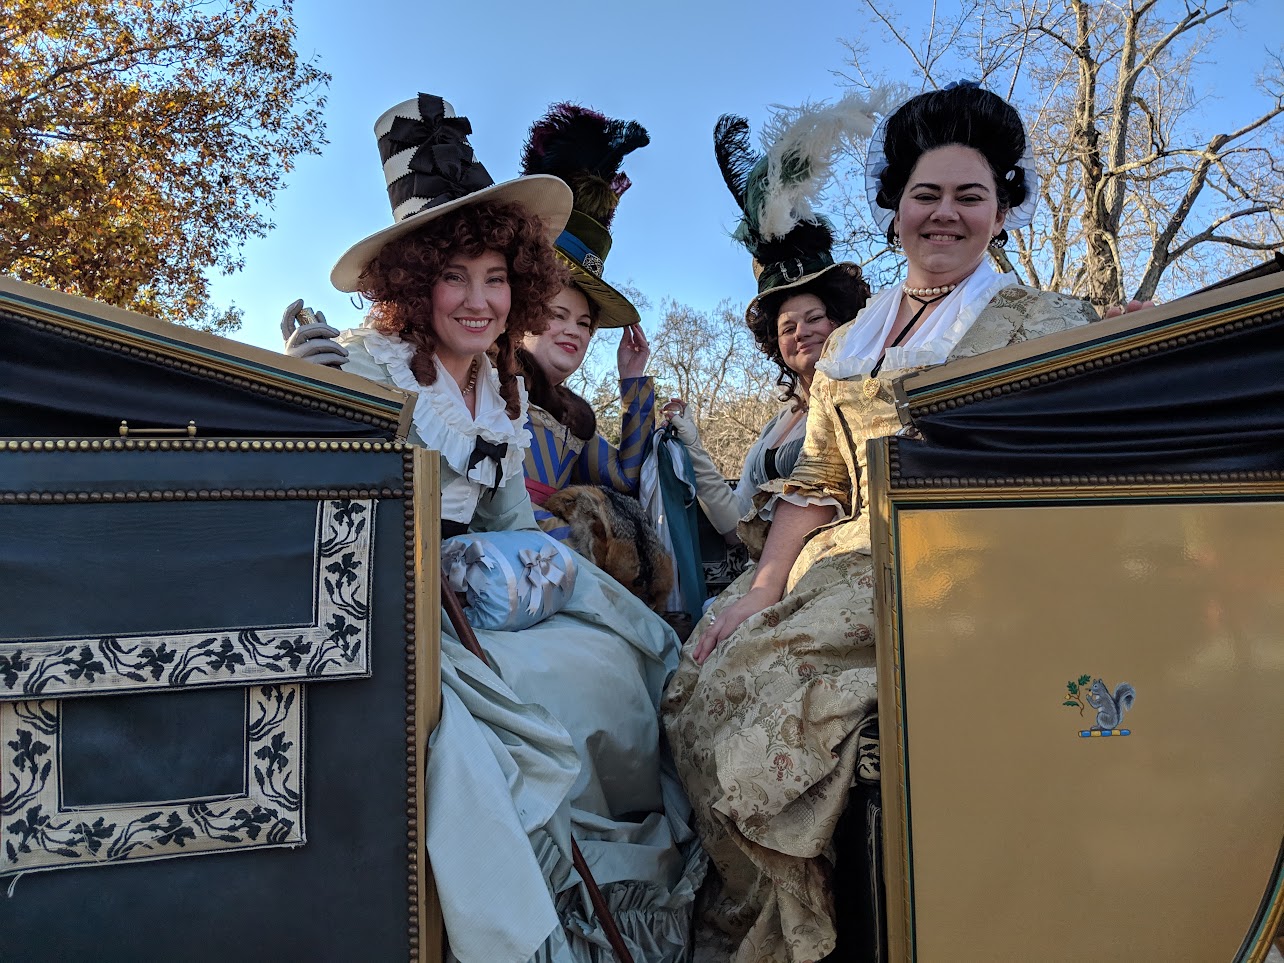
We so fancy!
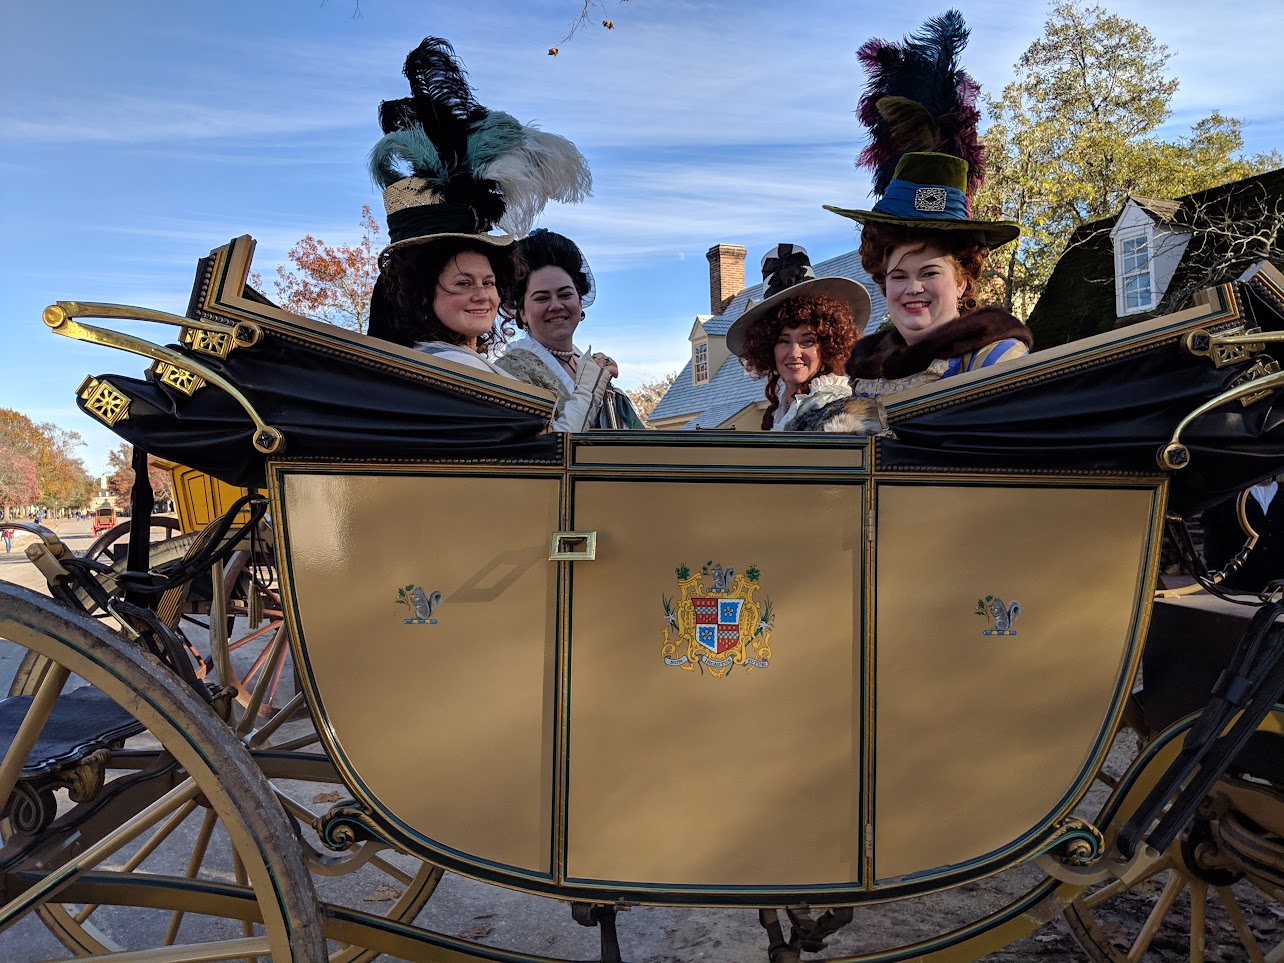
(photos courtesy of Dames a la Mode)
The gown I wore, my c. 1790 Cutaway Front Anglaise, was not new but I was struck by how different a look it had compared with the other few times I’d worn it and thought it would be fun to do a short post comparing them. Some changes are just differences and some are definite improvements!
Here’s how I wore it in spring 2016:


And then at Costume College 2017:

And here’s how I wore it the other weekend:

Here are the differences between my earlier wearings and this November’s, going from top to bottom:
- Hat & Hair


Now don’t get me wrong, I LOVE my Big-Ass Hat!! But it’s an unwieldy thing and just wasn’t going to work for a carriage ride with three other people, lol. I also wasn’t going to have time to make a new hat so I looked through the other ones I already had and decided to try the more modestly sized one I made to go with my printed cotton pierrot jacket back in spring. I was initially worried about putting the brown ribbon of the hat with the black ribbons on the gown but I found it didn’t bother me and I quite like how the hat goes with the ensemble! So yay for that!
The hair is definitely on the “improvement” side, lol! The earlier photo was my first attempt at a hedgehog style and I was still so very new to wig styling. It was…….not great. I think the most recent one is my 4th attempt at getting a hedgehog style I like on me and I do think it’s the most successful so far. It’s also in a softer red colour that looks more natural than the earlier one.
2. Jewellery & Neckline


This is definitely another area of improvement, particularly where the neckline is concerned! The black ribbon around the neck is fine, it’s a look I like and still do but having a necklace was a nice change and the earrings, even though they’re a subtle presence here (maybe I need to get a pair of the really big teardrop pearls!) definitely add dimension to the overall look.
The big change/improvement is, of course, the ruffles around the neckline. I love them! I did wear it earlier with a handkerchief and added the black bow for Costume College 2017 but nothing beats those ruffles for making it look properly finished and “filled out.” There’s actually two separate neckline ruffles here. The narrower one is a tucker I made as part of my alteration project back in February/March and I think I made the wider one to also go with my pierrot jacket. They’re made as independent, finished pieces that can be moved from garment to garment, along with the sleeve ruffles.
3. Stays
Unfortunately, I don’t have photos of either pair of stays, which is a pity since I just sold the old ones and they were such a pretty colour! However, I can tell you that in the earlier photos I was wearing stays that were just a little too short-waisted even for me (and I’m pretty short-waisted!). Last fall/winter I made a new pair that are a little longer waisted and more comfortable and I think they really help achieve a better look. And I should probably also fess up that I (intentionally) lost about 15lbs between the earlier and most recent photos, so that also makes a difference.
4. False Rumps
This is the style of false rump I wore in 2016 & 2017:

But I made a split version last winter using the American Duchess guide to 18th century sewing that I was curious to try with the dress:

I think it really helped to augment the silhouette.


Looking at these two photos now, I can really see how this style of gown back was meant to be worn with a split rump! You can easily see how the deeply pointed back waistline in meant dip between the false rump’s “cheeks”! HaHa! XD
5. Petticoats

These two photos have only 1 petticoat in common.
In the earlier image I’m wearing two plain white cotton underpetticoats, one with a ruffle at the hem. Over those is the white silk petticoat you see. It has a very soft hand and not much body to it.
In the more recent image I’m wearing a thick cotton mattleseé under, under petticoat I made last winter (it’s worn under my stays), a linen underpetticoat and the one cotton one with the ruffle at the hem. Over these is the one new piece I made for this occasion – the silk taffeta petticoat matching the gown. Funny story about this fabric: as soon as I saw it – and saw it on sale- I had to have it! I initially bought 6m of it. I took that home, gazed lovingly at it a day or two and then went back to the store and bought the remaining 6m on the bolt, I loved it so much! So needless to say, I had quite a bit of it and lots left over from making the gown. I had always meant to eventually make a matching petticoat for the gown and this little trip provided the perfect timing! Added all together the more recent skirt foundations and new petticoat create noticeably more volume, which I like! This doesn’t mean I won’t ever again wear the white petticoat with this gown and I’m actually curious to try it with the more substantial underpinnings to see how that would look. But I really like now having the multiple options – 18th century mix n’ match ftw!
6. Dat Cane
It brings so much attitude with it!

My purpose with this post is two-fold:
First, I wanted to show how big an impact small details and accessories can have and how much they can change the look of the same garment. You don’t always have to make something entirely new!
And Secondly to show that none of us start out with fully fleshed-out looks. It takes time and the accumulation of knowledge and experience to build the layers that create that.
Have you found this to be true with your own costuming?

Honestly, while all versions are lovely, my fav is the last. The volume of the extra matching petticoat AND the split ‘rump’ just pull the silhouette off to a tee. Congrats!
LikeLike
I love it all so much!
LikeLike
Thank you so much for this post. It really does help to have the photos and the explanation for each. It also helps in case one gets stuck on an unsatisfactory look and is teetering on the verge of despair. You’ve shown that there are creative “saves”. Thanks again.
LikeLike
The difference the split rump makes is fascinating!
Some great improvements!
LikeLike
Cheers! Very much so, re: accessories. It’s the little things that take it from “nice dress” to “just stepped out of the 18thc” (or whichever century!). I know I’ve gotten better about that over the past few years…it also helps that I do better these days about NOT sewing the dress itself until 2am the night before the event, ’cause that doesn’t leave much time for accessorizing, LOL!
LikeLike
Thank you for this – it was a wonderful post. Super informative and you look great.
LikeLike
The latest version is my favourite, the new petticoat, the hat, ruffles etc and the right underwear make all the difference
LikeLike
I’m a big fan of the cane, and love the way you used the same costume pieces but upped the outfit’s game. Thanks for the time you took to explain the underpinnings and silhouette. I am new to costuming and want to start with the mid-to-late 1700’s and I’m trying to figure out whether to start with a bum roll or a split rump. Is it possible to use the same petticoat with different underpinnings to change the silhouette without having a wonky-looking hem?
LikeLike
Hi Laura! Thanks so much for visiting and commenting! When I know an over petticoat (one that will show) is going to be worn with some kind of false rump I do cut the hem longer at the back, usually by 2-3″. I don’t bother with under-petticoats since they aren’t seen and the difference won’t be enough to affect the outer layers. Gown skirts from this period tend to be slightly trained anyway, so just make sure your length accommodates what the false rump takes up. Hope that helps!
LikeLike