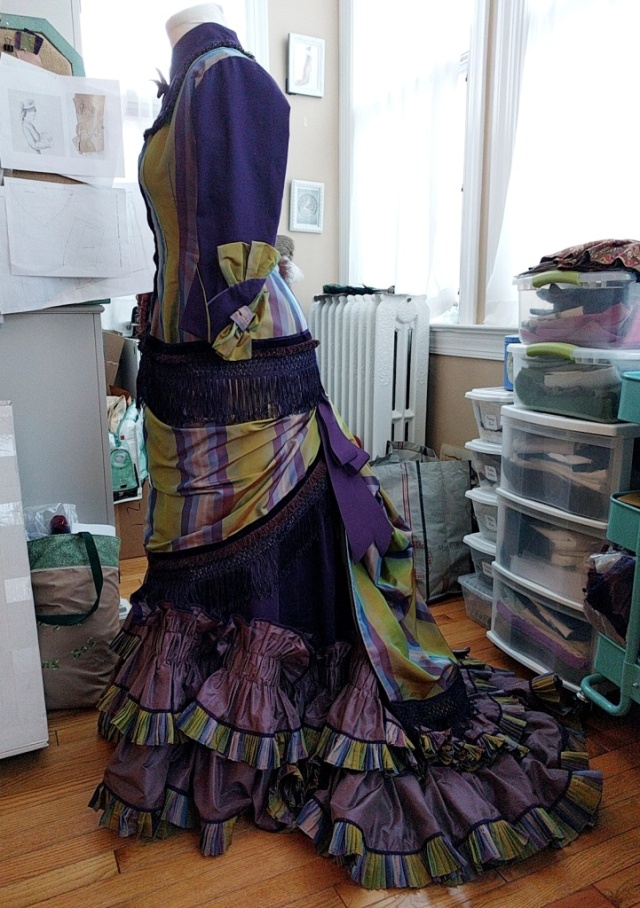
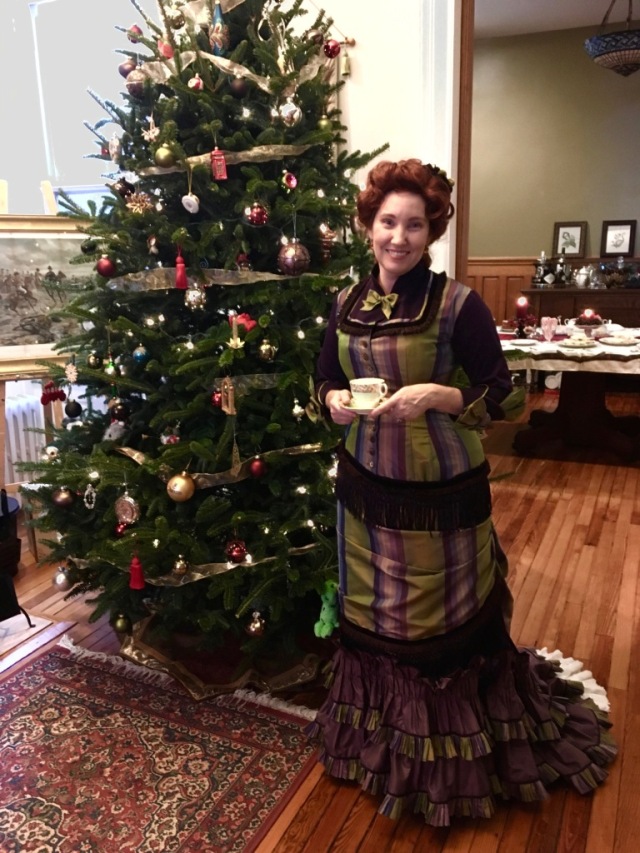
My latest – very frantic – make, is an 1876/77 Natural Form day or reception dress in striped silk taffeta and plum cotton sateen.
It was made to wear at a Victorian Christmas tea I hosted at our house last Saturday. A big part of the reason for the tea’s Victorian theme is that I’d started missing Victorian sewing over the past few months, nearly all the historical events and activities around here have been either 18th century or regency. I know, I know, life is so rough, huh? I swear I’m not complaining but I have wanted a little change of pace. I’m also still deeply into a Natural Form phase and had started planning out this dress at least two years ago so I was delighted to have a reason and opportunity to finally make it a reality!
I’m starting this post with a couple of shots of the finished dress so that you’ll have some frame of reference for the process and detail photos.
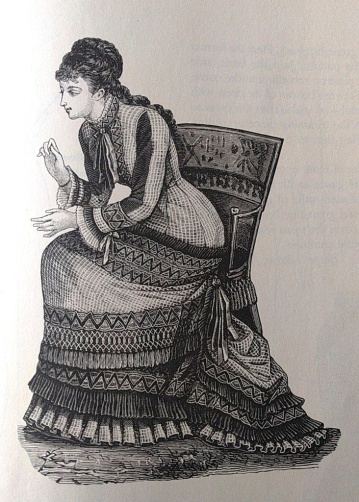
The style and pattern are mash-ups of about 5 different sources. The starting point was this fashion plate in my book of Harper’s Bazar plates:
I’ve coveted this (or something like it) for a few years now and thought my striped silk would be just perfect for it.
More recently I noticed this pattern in Frances Grimble’s Fashions of the Gilded Age Vol 1:
Upon closer inspection of the fashion plate and pattern in tandem I thought they actually had quite a lot in common and realized I could probably use the pattern to achieve something close to the fashion plate. I especially liked how the pattern cleverly makes a one-piece dress look like a two-piece overdress + underskirt ensemble thus simplifying construction and saving on fabric – Victorian sewing tricks FTW!
However, I did prefer the fullness in the skirt of the fashion plate over the slimness of the pattern. That’s when I took notice of the 1877 dress + pattern in (everyone’s go-to) Patterns of Fashion:
The skirt on this extant dress was significantly fuller than the Grimble pattern without being constructed from totally different shapes, meaning I could merge the two.
Here’s how I did it:
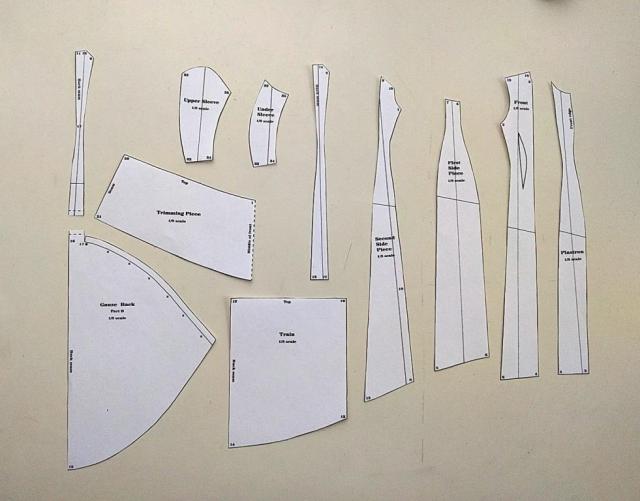
I photocopied the Grimble pattern:
Cut all the pieces out:
traced them onto a printable 1/8″ grid (the pattern is a 1/8 scale), merging the centre front and front pieces in the process a la the Janet Arnold draft, and added volume to the skirts of the other pieces:
The inner lines on the skirts of the side and side and side back pieces are the original, Grimble pattern, lines. I left them in situ in case I ever want to make this dress again with those lines. I then drew the full-sized pieces onto 1″ grid paper. It was SO much easier to make my modifications on the small grid rather than on full-sized pieces. I’m totally doing this from now on when I use scaled patterns!!
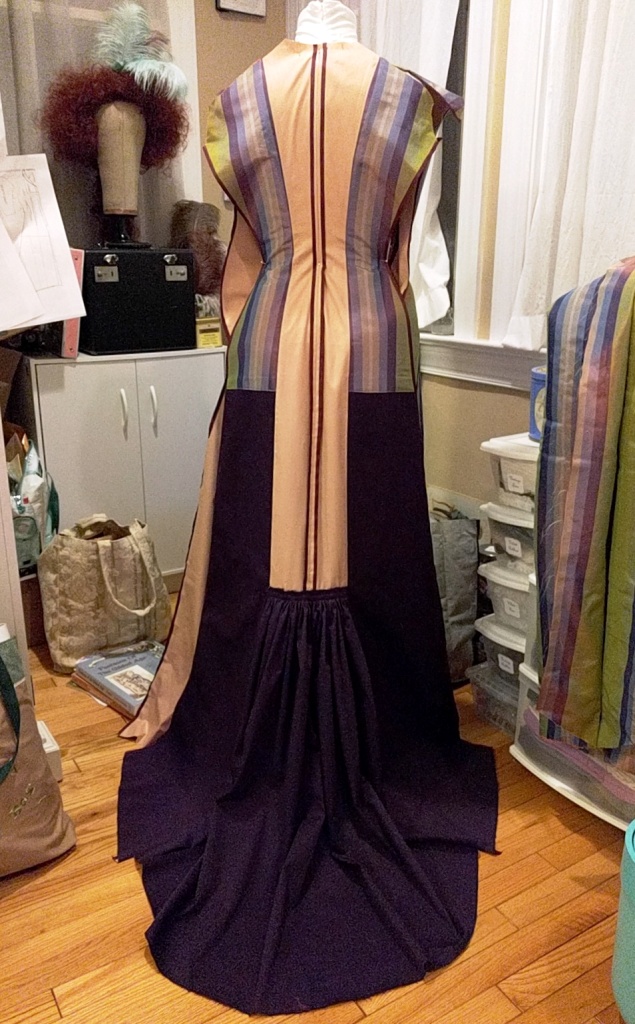
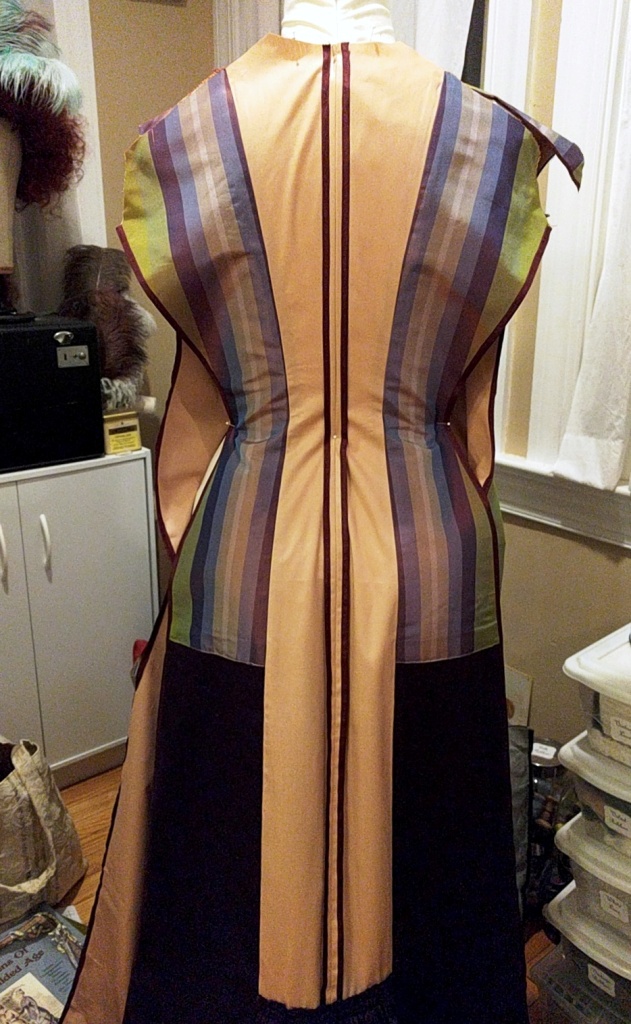
The trickiest bit, mentally, was figuring out how I wanted to do the centre back panel. Because the lining and fashion fabric layers each have their own separate trains I couldn’t flatline the cb panel as one normally would (and as the rest of the dress panels are). The train attached to the lining piece needed to be integrated into the rest of the dress so I sewed this layer on its own to the side back panels. I had intended the cb seam allowances (all bound with “hug snug” rayon seam binding) to face the interior of the dress like the rest of the seam allowances but got myself turned around with what should face inwards vs outwards and accidentally ended up with them facing out. Oh well. I wasn’t about the rip everything out for this piece of minutiae, I was under a crazy-tight deadline!
Here you can also get an idea of the “trickery” used in the dress to create the illusion of two layers in one: the striped silk is only on the upper part of the dress panels and the plum sateen is on the bottom portions. The joining lines are covered by the swag/drape that’s applied later on.
A couple of close-ups of the cb lining panel:
The upper edge of the gathered train piece gets hidden under the fashion fabric layer so I didn’t bother finishing it off – nor would Victorian seamstresses have bothered to do so.
The fashion fabric layer of the cb panel was constructed separately and then mounted onto the dress. To help make it clean-looking I flat-piped the edges of the panel with strips of the plum cotton sateen and then top-stitched-in-the-ditch the silk layer to the lining layer.
A close-up of what the inverted box pleats in the train look like on the underside:
Because I was under such a tight deadline for this dress (after patterning, cutting, laying the parts of each panel together) I had only 5 days to construct the entire dress. Nearly all of my waking hours for those 5 days was spent frantically sewing, leaving little time to even think about taking more process photos, let alone actually doing so.
Instead, I’ve taken a few detail photos of the finished dress to show various elements of the construction.
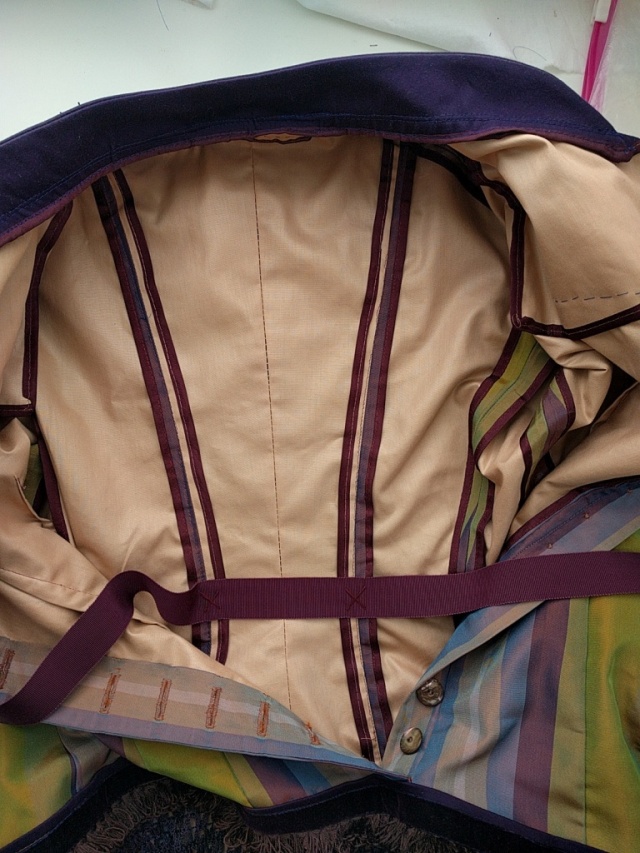
The bodice interior:
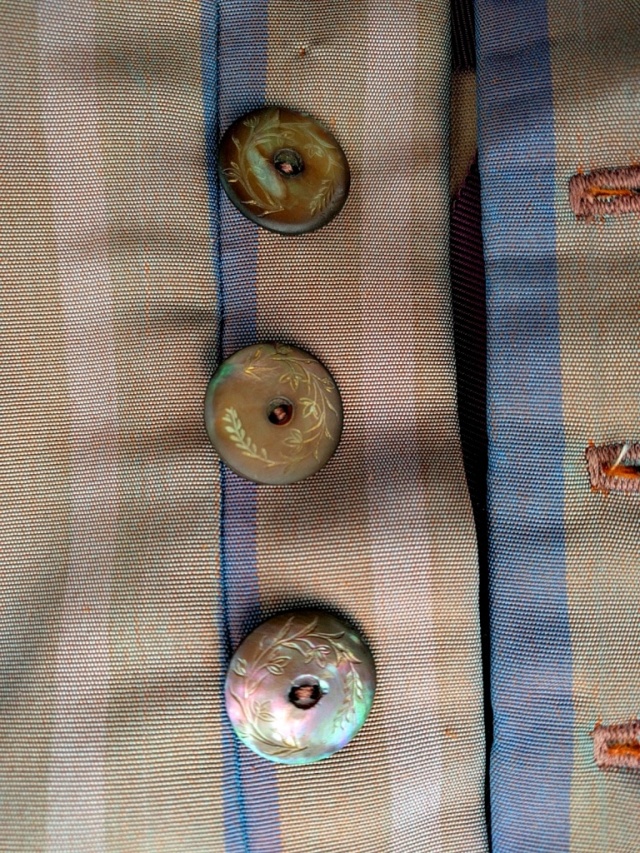
A close-up of the buttons I used – these are actual antique, carved shell buttons that happily fit the overall colour-scheme really nicely!
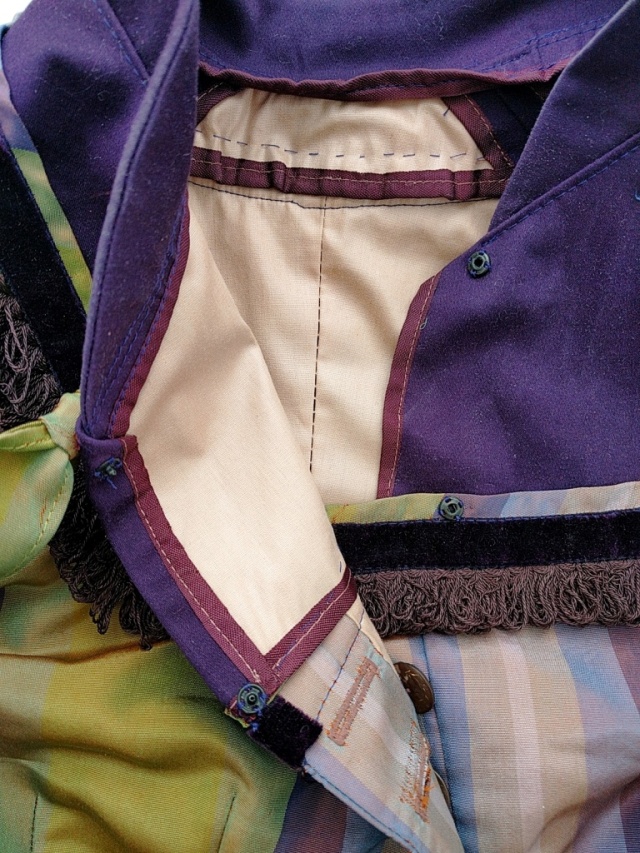
The neckline inset and collar. The neckline of the inset is slightly v-shaped as I though that would be more comfortable to wear than the more usual very close-fitting style.
I spent quite a bit of time finding an historical example of this to justify the decision and luckily found this image:
full image here
Which reminds me, one of the details still missing from my dress is lace at the collar and sleeve ends, I simply ran out of time for those but will add them for whenever I wear the dress next.
The inset interior:
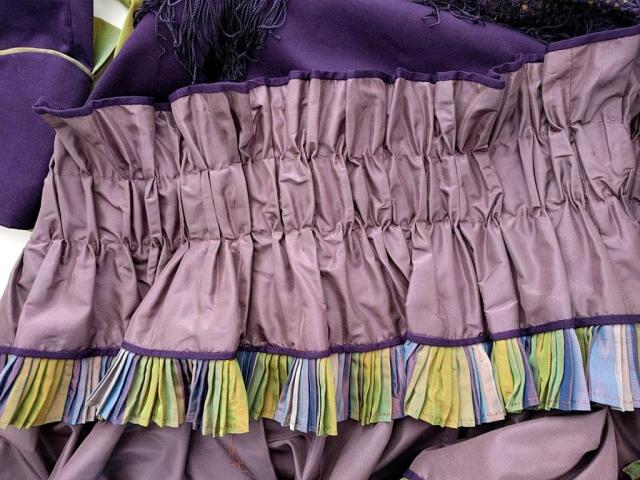
A shot of the hem ruffles:
The lower ruffle is just knife pleated and machine stitched to the dress:
The upper ruffle was more complicated. I knife pleated it, pinned the pleats down, pinned the ruffle to the dress between the pleats, then removed the pins holding the pleats and hand stitched gathers along two lines I had drawn around the ruffle, I tacked the ruffle to the dress at the point of each pin holding the ruffle piece to the dress. Ok, that’s a mess of a sentence, did that make sense?
The striped ruffle was made and added to each larger ruffle before they were mounted to the dress. They were made using the ruffler foot on my Singer Featherweight and then fingerstroked for pressing into a semblance of decent little pleats:
This was, BY FAR, the most tedious, least pleasant part of the whole process. And making the ruffles and setting them onto the dress took me nearly two whole days (of the five I had to construct the whole thing)!!
The upper and lower edges of both solid mauve ruffle pieces were flat-piped with strips of the cotton sateen and then the striped ruffles were machine stitched-in-the-ditch to the underside.
I cannot describe how happy I was when this part of the process was finally over!
On the upside, I really enjoyed making the sleeve cuffs! They were based on this extant example – the great detail shot of them also really helped:
image link here
Here are mine (I didn’t have enough self-cover buttons to add matching fabric buttons and had no time to pick any up, that will be another detail to add later):
Unfortunately, the underside of the flat piping keeps flipping up, and since it’s cut on the garment bias rather than the true bias (a bit of cheat due to time constraint) it looks pretty ugly under there. So add that to the list of detail bits to be addressed in future.
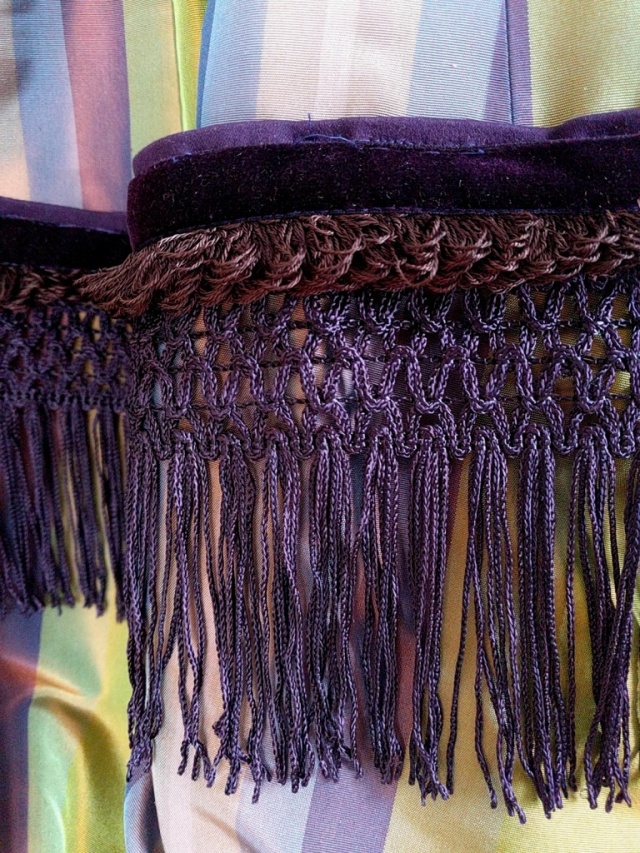
Here’s a detail of the trimming on the swag/drape piece. It’s a combination of vintage silk/rayon velvet ribbon (this stuff is unbelievable soft, it’s just gorgeous! I found it on ebay here – and there’s more left!), some looped fringe I’d had in the stash for I don’t know how long, and some long knotted fringe I got from Patchwork Panda trims especially for this project back when I first conceived it about two or more years ago:
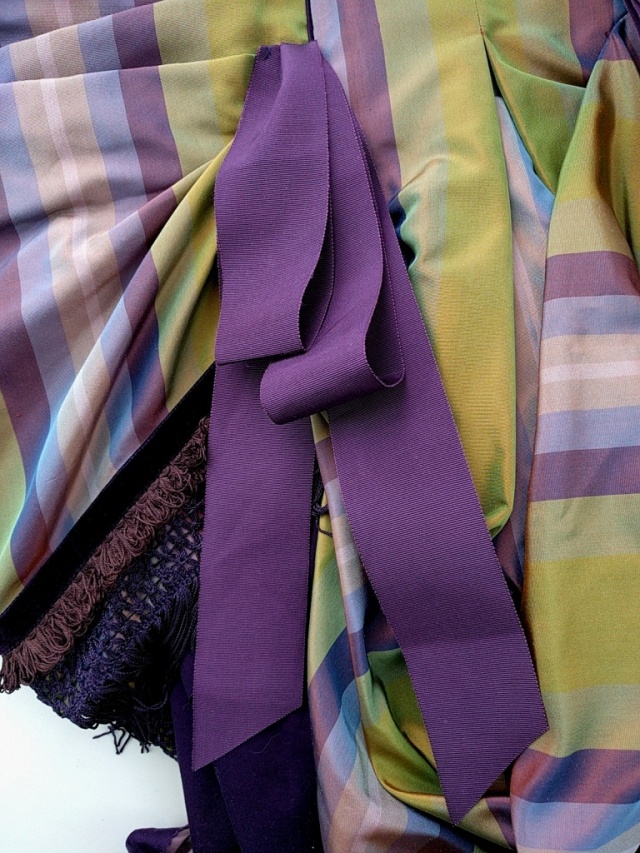
To help finish off the look of the back train draping I added some wide vintage grosgrain ribbon. The upper edge gets concealed by the fringe on the swag/drape piece:
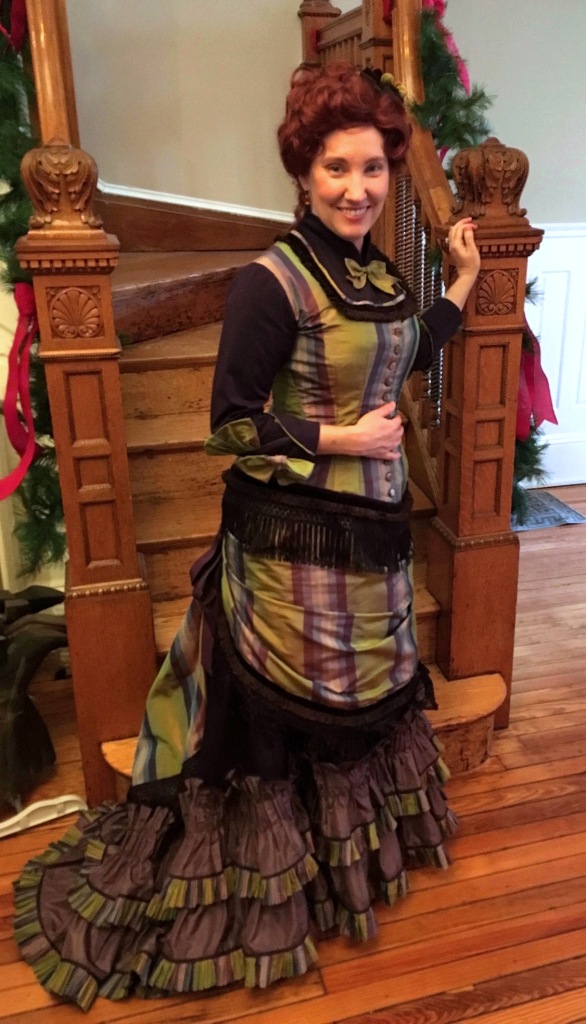
The dress was made for/debuted at a Victorian Christmas tea I hosted at our house last Saturday and a couple of the guests were kind enough to take some good photos for me, so here is the dress on me and “in action”

Photo by In the Long Run Designs

Photo by In the Long Run Designs
I have to admit, after I’d finished setting on the ruffle and before the swag and sleeves were on I wasn’t sure how much I liked the look, but it all came together in the end and now I love this dress! It turned out just as well as I’d hoped and I do hope I’ll have other opportunities for wearing it in the not-distant future.
I’m sure I’m not alone in the experience of being unsure about a project mid-way through only for it all to come together in the end – what have yours been? (And rest assured, I have also had experiences where I was unsure of a project part way through and things only got worse from there to near or total failure!)














Wow! How fabulous- and in suffragette colours too! 🙂
LikeLike
Ha! I didn’t even think of/notice that! Wait…I mean…..yeah, that was totally on purpose! ;o)
LikeLike
Gah! What a thing of beauty! I saw the video Taylor posted on Facebook a couple days ago but I love reading about the process too!
I always hit that “i hate this” point with big costumes, the most recent being compounded by a bad anxiety spiral, and with novel-writing. I always remind myself of Dory when it happens – Just Keep Swimming!
LikeLike
Ugh, that sucks about the anxiety attack, sorry to hear that. I will admit this project became more like a labour of hate than of love. The main reason I persevered through it was because I hated the idea of having yet another UFO in the pile more than I hated spending every waking moment on it for a week that was nestled within a larger period of high-stress. Being on the other side of it now, however, I am so glad I pushed through and have a great feeling of accomplishment.
So yes, just keep swimming! Even if you have to slow way down keeping moving in the direction you want to go still helps you get there!
LikeLike
And in the end it came out gorgeous! The video was “wow thats beautiful” and the pictures at the top of the entry made my jaw hit the floor. I love it 🙂
LikeLike
Just beautiful
LikeLike
Thank you!
LikeLike
WOW! Just freaking wow! I know it is a pain in the bustle to take photos, describe the process and post your sewing adventures but THANK YOU SO MUCH for taking the time to do it. Your posts are always so beautiful, informative, and inspiring!
LikeLike
Haha, I see what you did there ;o) Thank you very much!
LikeLike
Oh my Gosh! Look at your dress. I don’t even have words – creative, intricate, beautiful – how long does it take you to complete such a lovely project?
LikeLike
Thank you! This particular one was a rush job. It took me a few evenings-worth to sort out the pattern, cut it and lay the fabric pieces on the linings. Then the majority of the construction happened over 5 days since I was in a terrible time crunch. I started before 7am each day and worked almost continuously until 10pm each night. So…..that’s 13hrs/day x 5 days = 65hrs + probably about 10 hrs for the prep work I did beforehand.
LikeLiked by 1 person
I’m not surprised – the details are fantastic. It doesn’t look like a rush job. It is lovely! hmm does that qualify as “sweat shop” hours?
LikeLike
Wait, no. Apparently while I’m good at sewing I suck at math. 7am to 10pm is 15hrs, not 13. So that’s 15×5=75 + approx. 10hrs prep. I think that definitely counts as sweatshop labour – at least it’s self-imposed!
LikeLike
!!!
I am stunned by how amazing that is. I have in the back of my mind to make an elaborate natural form dress that has all those tiny details, and this perfectly exhibits the feeling I would go for – everything that can be trimmed, ruffled, pleated, or layered is, and comes together stunningly.
LikeLike
Thank you! And if it helps, it’s really not that hard, just time consuming. The key is to figure out how to break the project down into its component parts, then work on it one part at a time then assemble the parts together.
LikeLike
So much math in this, and a deep bow of appreciation for the peek into your process (copying, cutting, altering at the scale model point). As ever, this makes the world such a better place to be. All of my best and highest regards for you and yours for the new year. I could not mean that more if you were my real family.
LikeLike
Thank you very much! And all the best to you and yours back! :o)
LikeLike
That is absolutely beautiful. I love the colours, and the slight iridescence of the buttons is the perfect finishing touch.
LikeLike
Thank you! For some time during the planning phase I wasn’t sure how to choose buttons for this and was so very happy when I remembered having these and that they were such a good fit!
LikeLike
This is making me fall in love with natural form gowns…
LikeLike
Haha, thank you! There’s certainly a lot to love from this period. For me, it’s especially the first part of Natural Form (1875/6-1878) when you still have all the flounces, ruffles, trimming and the sweeping trains combined with the close fit through the hips – so elegant!
LikeLike
I love the colors so much – it makes me think of a peacock, but in an elegant historical way. The details on this (like the sleeves) and the trims you found for it are dreamy, such amazing work!
LikeLiked by 1 person
Thank you very much!
LikeLike
I saw the video of this and I was FLOORED! Absolutely FLOORED by how gorgeous the color and movement is! And in one week?! Wow!
LikeLike
It was a marathon alright! Glad you liked Taylor’s little video!
LikeLike
Hi There!
Your gown is just beautiful! Is there any chance you might be willing to let us use your photos, with acknowledgment and profile of course, in the upcoming issue of Costumers Guild West’s Squeals newsletter as cover model?
Thank you!
Athena
LikeLiked by 1 person
Thank you! And I would be so flattered for you to use my photos – but the ones of me in the dress weren’t taken by me or on my camera so I’ll have to get permission to use them (I think should be fine but want to make sure).
LikeLike
How beautiful you look in this gorgeous gown. What a fine production. You should be very proud of this creation
LikeLike
Thank you very much! I won’t lie, I am very happy (more than a little relieved) and rather proud of how well it turned out!
LikeLike
Many, many beautiful things here, but I’m particularly loving the buttons.
LikeLiked by 1 person
Thank you! And yes, the buttons. They were such a little treasure of a find!
LikeLike
This dress is absolutely stunning!! And I love the colour scheme! 😍❤️
LikeLike
It looks amazing! Great job on finishing so quickly, and I love all the little details.
On a slight side note, I just saw this fashion plate and couldn’t help but think of your dress when I saw it. https://s-media-cache-ak0.pinimg.com/originals/39/46/d2/3946d25ef54e9089364d14fe5d1ae1e3.jpg
LikeLike
Ha! Yes, I can see why. That fashion plate is later Natural Form than my dress, but the colour combinations plus stripes is very reminiscent! Makes for a handy justification of my fabric choices, thank you! ;o)
LikeLiked by 1 person
Holy Smoke! This is lovely, I can’t seem to lift my hand to sew on a button these days. What an inspiration!
LikeLike
Thank you! I think we all go through periods of sewing ennui for one reason or another, whether it’s lack of time or burnout, etc. Don’t try to force it, maybe just enjoy what other people are making and that may, in time, help give you the inspiration you need to start again?
LikeLiked by 1 person
Fabulous! You do the best details and I love the cuffs especially. I almost always have a period of crushing doubt about two this’s of the way through a big project—sometimes deserved, but mostly it turns out ok. Gorgeous work—the natural form shape is so much fun!
LikeLike
I figured I probably wasn’t alone in this – your description of “crushing doubt about 2/3 of the way through” is a very accurate statement! And Natural Form *is* so much fun – you should totally try it!! The corset(s) and petticoat(s) you’ve already made could be used for it, you’d just need a bustle pad (small and super quick to make) to finish out the silhouette and could then get right to the pretty dresses! (am I convincing you yet?)
LikeLiked by 2 people
It came out lovely and it was wonderful to see in person!
LikeLike
Thank you! I was so glad you could make it. I’m just going to have to discipline myself a little more and make sure I get good individual photos of everyone next time.
LikeLike
This is absolutely fabulous!
LikeLike
Thank you very much!
LikeLike
I absolutely adore your dress, and may I add what a marvelous job you did on the making of it!!! I have so often said that I was born in the wrong era! I could wear dresses like this and of the Civil War era everyday! They are chocked full of all that was intended to be graceful and elegant! I only wish I could sew or have the means to have one made for me!
LikeLike
Outstanding Design!!!!
LikeLike
Thank you very much!
LikeLike
Bonjour,
Je trouve votre projet magnifique.
Pourriez-vous m’indiquer le métrage des différents tissus que vous avez utilisé ?
Merci d’avance pour votre réponse.
LikeLike