To re-cap, here is the bodice pattern I was using from Janet Arnold’s Patterns of Fashion:

I did make and fit a muslin first but am not going to bother with that here, let’s get right to the fun stuff!
I chose to use a different bodice seaming method from the original dress. Arnold’s notes state the original bodice is mounted to the linen lining, so probably using lapped seams, comme ça:

Berrington Hall, Accession# SNO29

Berrington Hall, Accession# SNO29
However, I wanted to use a technique particular to the late 18th century, which so far seems to have no name but looks like this on the inside:

Hereford Museum, Accession# 4984
By this technique, each bodice piece is individually lined and then sewn together at the edges.
My first step was to line each bodice piece. To do this I running stitched around the edges at the seam line (taking a slightly smaller seam allowance than given)…..

then turned the pieces right side out:

I did this for the bodice back and side back pieces.
HOWEVER, between doing those and then the fronts I learned that this whole step what wholly unnecessary and probably not used in the period! In actual fact, you only need to fold under the edges of the fabric and lay them together. No actual sewing of the pieces before seaming is really required. So – do not do what I initially did! It just makes more work for yourself than needed.
For seaming the pieces there are a few different sewing options: small running stitches, whip stitching the edges or a sort of angled running stitch that also seems to have no specific name for the technique (please feel free to correct me on this!). I have seen all of these on different extant dresses.
My first foray into the technique was on my white cotton 1797 gown and I used the running stitch method.
For this gown I wanted to try the whip stitched method – although this was largely because I couldn’t figure out how to do the diagonal stitched method, which looks a little like herringbone once completed. And wouldn’t ya know, while I was in the middle of my seaming the marvellous ladies at Colonial Williamsburg’s millinery shop posted a video demonstrating how to work this exact technique. Check it out, it’s so simple! It makes me want to do another of these dresses just so I can try it out!
But I wasn’t about to either undo all the stitching I’d done so far or use 2 different techniques in one dress – I like clean and consistent appearances as much as possible, even on garment interiors.

Here’s how it looks on the inside:

Next up was adding the shoulder strap lining pieces. On the original dress there are *only* the linen lining pieces, which are then covered up by the pleated trim around the neckline. I like things cleaner than that and didn’t want to trust to only trim to completely cover over the shoulder – but more on that in a bit.

Here’s how it looks from the right side:

Next up was to make the sleeves. I based mine off the pattern from a different dress in Patterns of Fashion

I made up the lining layer first:

Then wrapped the silk sleeve around it, wrong sides together….

And sewed it directly to the lining with a pricked backstitch:

Here’s what that looks like from the inside:

The lower edges of both lining and silk layers were folded up prior to sewing the seam and I did a slanted hemming stitch all the way around from the inside:

Finished sleeve (minus the cuff):

The sleeve is sewn into the bodice at the underarm with backstitching – seen here from inside the bodice:

And from inside the sleeve:

And is looks like this from the outside at this point:

The sleevehead is then pleated and tacked down to the shoulder strap lining piece:

Then I took the silk shoulder strap, folded in the seam allowances and prick-backstitched it over the linen piece

So now it looks like this:


Of course, after I’d sewn the underarm portion of the sleeve to the bodice I remembered that I should probably have done the cuffs beforehand, but I wasn’t about to undo my sewing just for that. So it’s currently got one sleeve on and one sleeve off.
To recap, the style of cuff I’m going for is this kind of idea:

I first took a pattern from the finished sleeve (literally just traced around it) to a base made of linen.

Then I had no idea what to do! Although I’d encountered several examples of this cuff style while examining extant garments in museum collections I hadn’t done so with the idea of reproducing one. Fortunately, I got some advice and suggestions from the 18th Century Sewing and Historically Accurate 18th Century Sewing groups on fb, primarily from Sarah Woodyard, a milliner/mantuamaker at the Margaret Hunter shop in Colonial Williamsburg.
I went through several trial approaches and finally settled on the messiest, most random one, lol.
I cut rectangles of silk approx. 2x that largest measurements of the linen base. I pinked the top and bottom edges with my pinking tool, box pleated them, and mounted and tacked the upper and lower edges to the linen base. I placed a few “balance” pins (or whatever you’d like to call them) around the middle of the cuff to help keep the fabric evenly distributed around the whole – I hope that makes sense.

Then I worked a spiralling row(s) of zig zagging lines of stitches around and around the cuff, pulling the stitches up as I went along and not being careful about neatness or consistency in the stitching – I wanted this to look as much like random puckering as possible. And I got this:

I matched up the seam in the linen cuff base to the dart I took in at the back of the elbow on the sleeve and tacked the cuff to the sleeve.
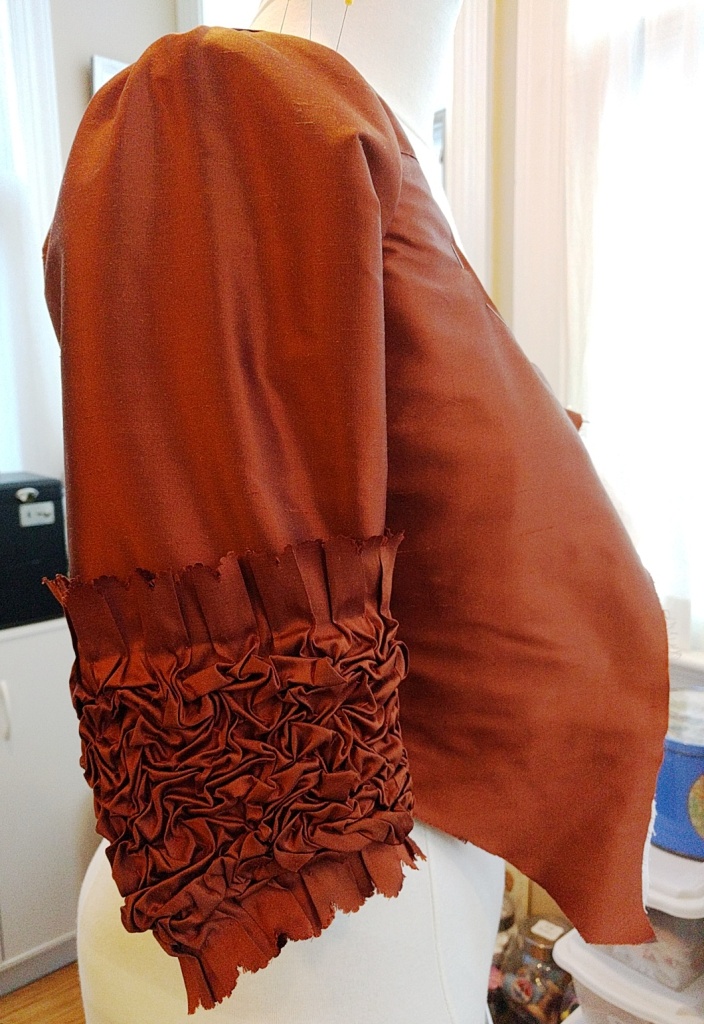
Oh, but before I mounted the cuff to the sleeve I gave it a gentle pressing all around to sort of help “set” the puckers and also help hide the stitches – I had made the overs and unders pretty even and realized only when I was nearly done that they should be short/small overs and longer unders so they aren’t too visible. I’m doing this with the second one.

Now, the neckline, front and waist edges of the bodice currently remain unfinished. There is a reason for this: I think it will be best to finish the waist edge after the skirt has been sewn on, and it will be easiest to finish all those edges at the same time because of the way I’ll do them. So, I will post this, just later on.
Next up will be the skirts (all the tiny pleats)!

Wow, that is incredible!! You are doing such a fantastic job on this gown. Thank you for sharing all of the details with the photos.
LikeLike
Thank you very much! I’m excited to see how it’ll look when it’s all together and finished!
LikeLike
What kind of “pinking tool” did you use on the cuffs?
LikeLike
It’s a scalloped pinking tool. I’m going to do a little post specifically on the cuffs soon and I’ll be sure to include a picture of the tool – stay tuned!
LikeLike
Fun cuffs! Thanks for sharing!
Best,
Quinn
LikeLike
So cool!!! Love reading about the hand sewing process, I’m so fascinated by all the different methods!
LikeLike
Thank you! And the more I do hand sewing the more I seem to love it – although I will be happy to do some machine sewing work for a bit after this is all done, lol.
LikeLike
Fascinating post! Thanks for all the photos and the explanations. The cuffs are amazing.
LikeLike
It looks very pretty already, love the way you did the cuffs! And thanks for the clear progress pictures, it’s always very nice to see how something comes together.
LikeLike
Thank you! I’ve long admired this style of cuff and am excited to finally, actually make a set.
LikeLike
Gorgeous, gorgeous project, I am so looking forward to following this along!
I was wondering when you referred to the “sort of angled running stitch that also seems to have no specific name for the technique” joining multiple lining/outer pieces, if you’re maybe thinking of ‘le point a rabattre sous la main’…several other 18thc clothing bloggers have some posts detailing the stitch; it might not be what you’re referring to though.
LikeLike
Thank you! And thanks also for reminding me of ‘le point rabattre…’ I should double check that out to be sure but I seem to recall either the ladies at Williamsburg or someone else saying this was not quite the same. And I will amend this post to clarify one way or the other.
Thanks again!
LikeLike
Pingback: c.1780 Italian Gown – In Action – literally! | The Modern Mantua-Maker
Hi! I know this is an old post, but I’m working on my first Italian gown bodice. I’ve attached the middle back pieces with the English stitch (the herringbone one) but can I also attach the front bodice pieces to the back using that stitch? Or would that not be a good idea? From your pictures of the inside, it looks like you did attach it that way, but on the outside one (with the pins), it kind of looks lapped over the back pieces. Help! Thanks!
LikeLike
Hi there! You can actually do it either way, I’ve seen both methods on extant examples. It looks like there could be a real mix & match of techniques and methods in this late 18th century period!
LikeLike
I have read and re read the process of the making of this gown- I am in awe every time I read this; I too wish to sew an Italian gown – I hope it turns out as beautiful and consistent as this one! Thank you for sharing ..!
LikeLike