This project was finished about a month ago, but I only just got photos of me in it this week, so waited until now to do a proper post. I started this early in the year and used it as my entry for the Historical Sew Monthly challenge for March: Stashbusting.
My teagown is a combination of this inspiration original piece (It’s dated 1886 but I don’t know by what authority and the overall silhouette looks comparable to Natural Form to me):


Using the Truly Victorian 1882 Teagown pattern TV432 as my base pattern:

And six fabrics in my stash ranging from a few months to over ten years of stashdom.
I put these all together and got this:
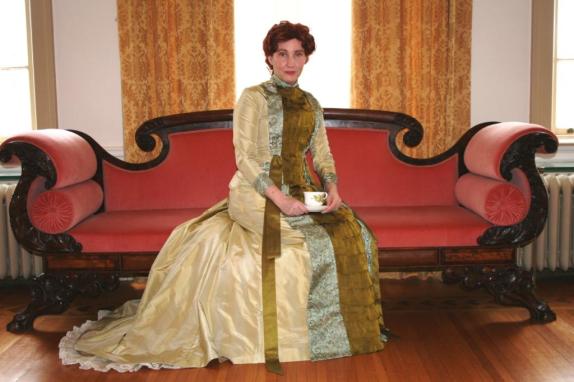
Hello! Welcome to my teagown!
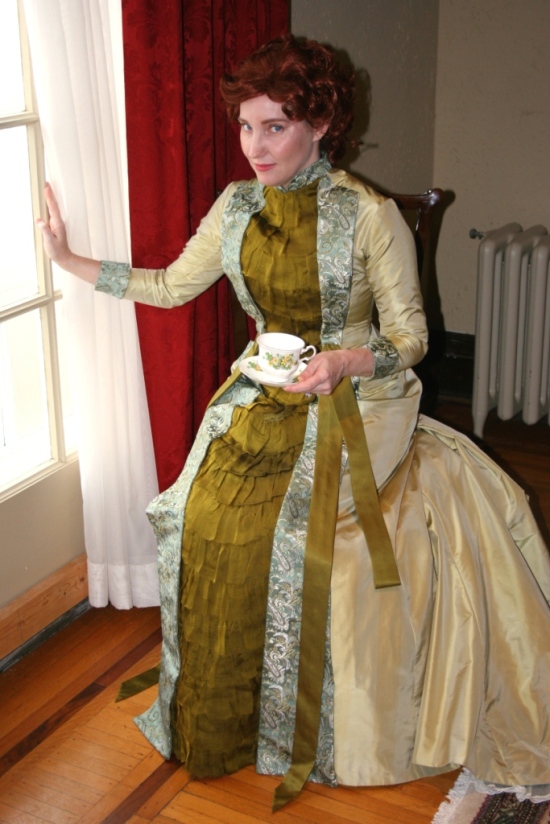
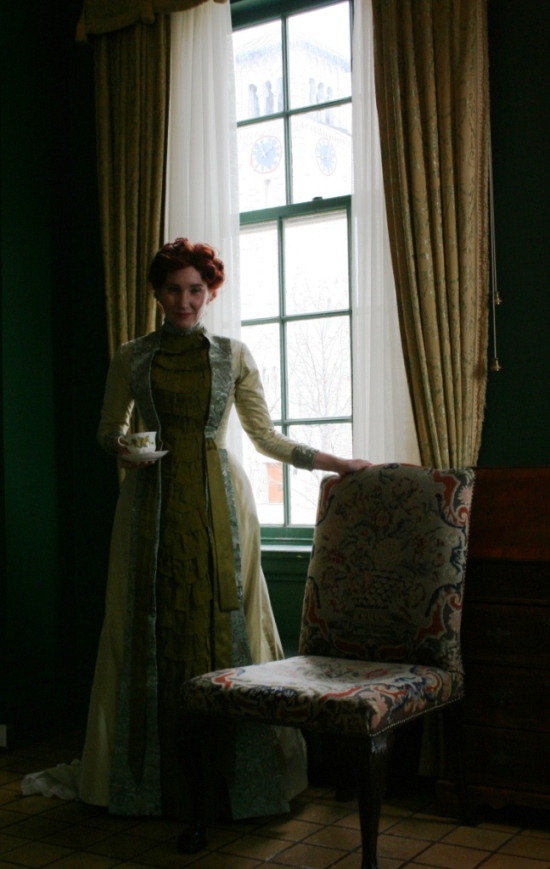
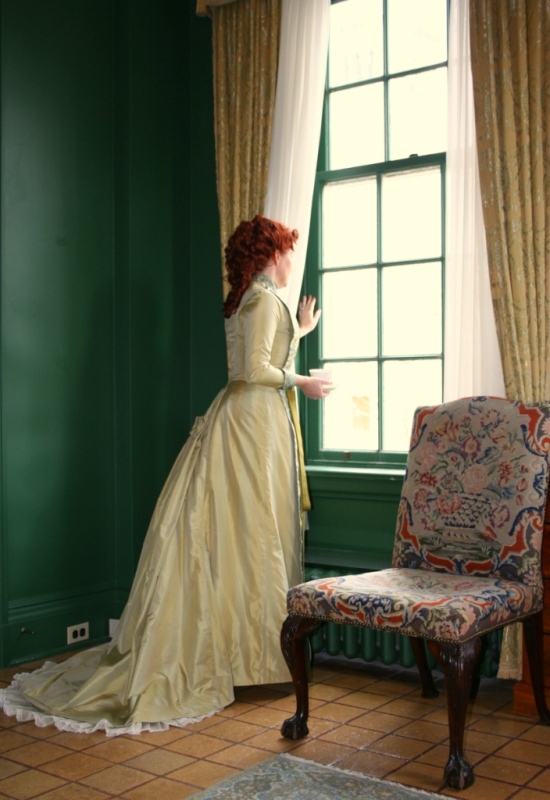
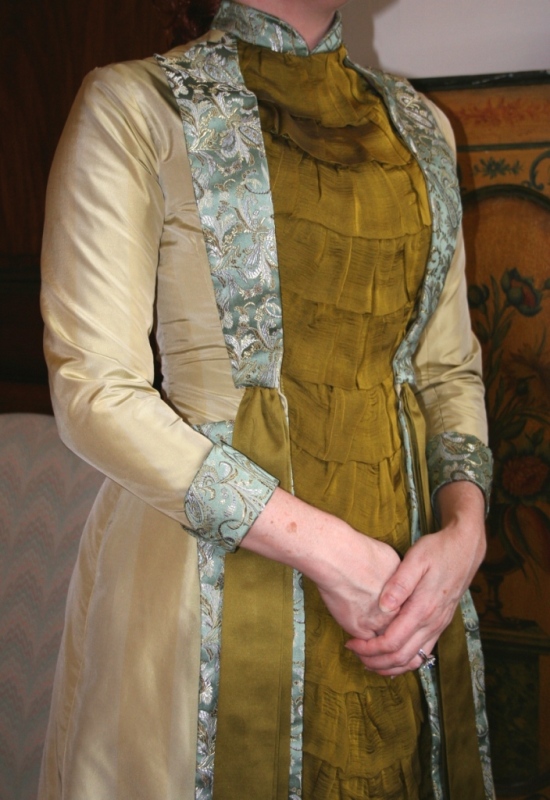
The main fabric is silk taffeta in a subtle stripe of celadon and a sort of pale gold/olive. The centre front panel comprises silk chiffon ruffles over a silk charmeuse base in closely matching shades of olive green. The collar, cuffs, and lapel thingies are a Chinese silk brocade – so a silk/rayon blend, but close enough says I! The front “ribbons” are made from a piece of cotton/silk satin in an olive green that matched really well with the chiffon and charmeuse. It really felt like these were all meant to go together!
It’s worn over my full set of Natural Form foundation garments, and my pink corset.
The main alteration I made to the TV pattern was the front panel, but was a pretty straightforward process. I simply drew on the front pattern piece (well, my traced off copy of it) where I wanted the front panel, took the centre most dart allowance out of the resulting edges of front panel and new gown front piece and smoothed the curves/edges. If I remember correctly, I even did this before making my first mock-up.
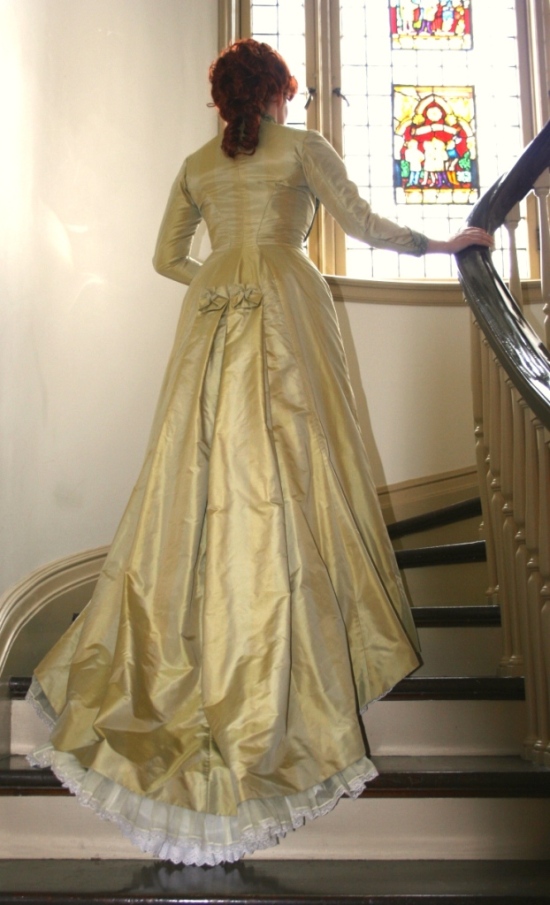
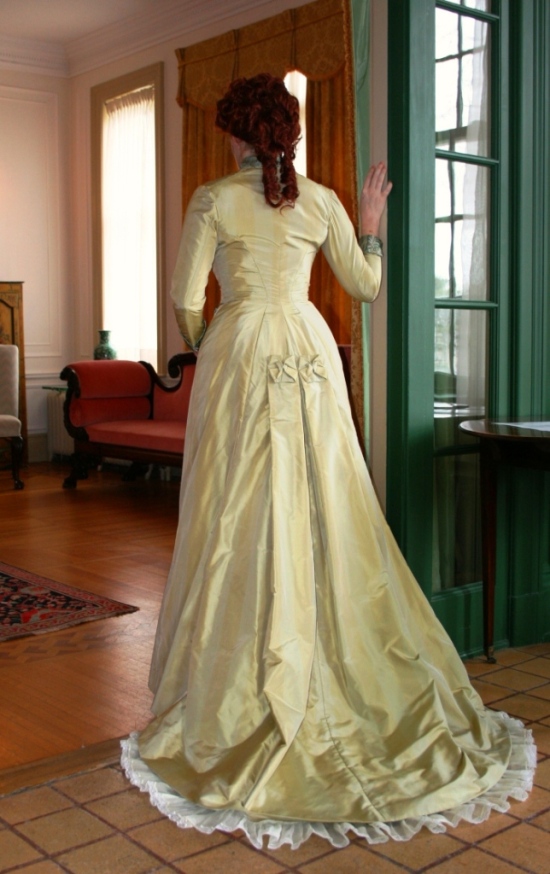
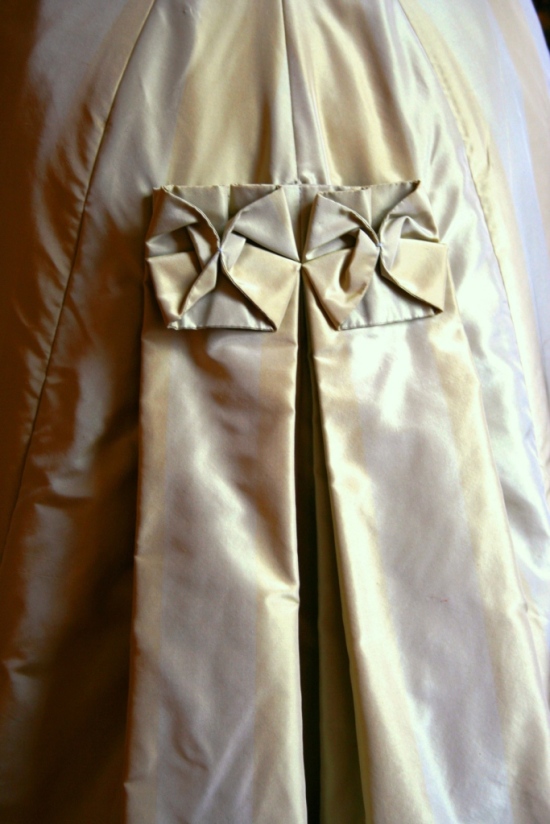
The next major divergence is the back. The line drawings for the pattern show 2 options: a smooth, seamed back or a pleated Watteau back. However, I think a third option, the one I chose in order to copy the original gown, is actually provided on the pattern itself. I haven’t seen any examples around the internet of this option made up, so I don’t know if people just don’t realize it’s there, or that’s what it is, or whether I’m the only one so far who likes it! (if anyone else has run across this please do share, I’d love to see other people’s take on this!)
Less major changes I made were to lengthen the sleeves from 3/4 to 7/8 length, and add more fullness to the back pleats and a bit of length to the train. I just drafted the cuffs and lapel pieces.
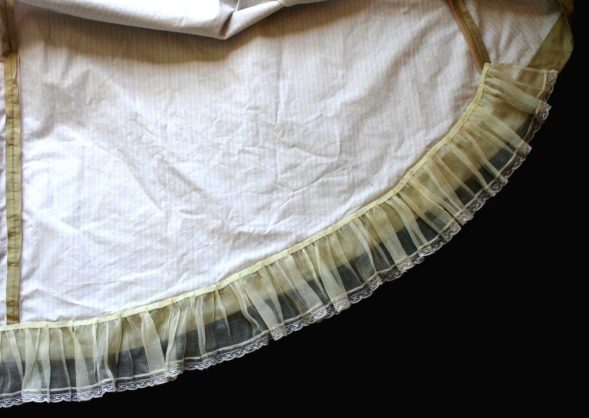
I flatlined the entire gown with a cotton sheet I got from Value Village. It has a little woven stripe in it that’s very subtle, but which I really like for some reason. I bound all the seam allowance edges with cotton bias binding that was already in my stash – hence why it isn’t all exactly the same, lol.
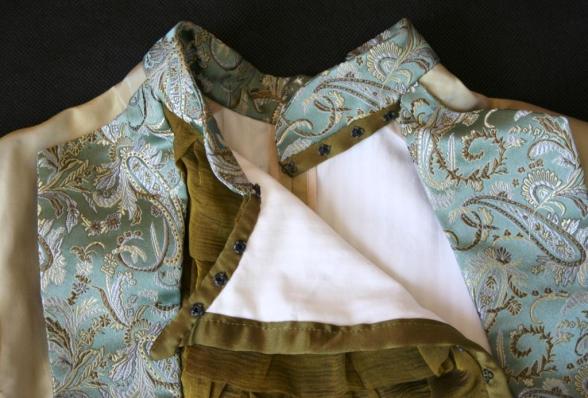
It opens and fastens up one side of the centre front panel from the lower hip to the neck with a combination of snaps and hooks & eyes. I’ve seen similar-ish combinations on extant garments and for some reason prefer sewing snaps to hooks and eyes, so used them wherever I could.
The collar fastenings are the fiddliest bit as the lower end of the free section needs to tuck behind the corresponding neck edge of the centre front panel, yet the upper corner of the panel needs to tuck in under the dress front edge where it meets the collar.
The gown front edges, hem and sleeve ends are all faced with the silk taffeta. The ruffle under the hem is made from a small piece of pale yellow vintage cotton organdy I found in an antique shop (and had for a few years knowing that eventually the right use for this little piece of special fabric would come along !) edged with some off-white vintage cotton lace.
My friend Sarah obliged me by taking photos. The location is the Agnes Etherington Art Centre on Queen’s University campus in Kingston, Ontario, Canada. The art centre is a museum/gallery with a particularly interesting feature – it’s attached to a historic house, Etherington House. It was the lifelong home of the art centre’s namesake, who donated it to the university during the mid-20th century as a place for art instruction to begin at Queen’s. Over time, the art centre grew beyond the house (by a lot!) but remained physically attached. It’s now a sort of informal museum space that’s also used for social functions and events. I was curious about trying it out as a backdrop.

It wasn’t as perfect as I’d hoped, the lighting was difficult, so we had to use the flash (which I hate doing). If I was more on the ball I’d have prepared an idea I’ve had for a while to make a little vellum sort of cover for my flash to (hopefully) diffuse the light. But Sarah was a really good sport and got some nice shots all the same! At some point I’ll try doing photos again – in natural light….maybe in a garden. Surely teagowns were acceptable to wear in one’s own backyard?
I also most definitely need a better wig. Someone help! I’m terrible at hair!
Fancy joining me for a cuppa?
Mood lighting fun.
I don’t know if this will help anyone out, but here’s what the back pleats look like from the inside:
Thank you for visiting, now it’s time for me to change into something I can actually wear in public. Ta!
Overall I’m extremely pleased with how this turned out, and I love wearing it! I have identified just a few things I may or may not address at some point. When I made the mock-up I was being good and running fairly regularly. That had dropped off some by the time of the photos, so it’s just a little too snug through the middle and that’s why it doesn’t lie smoothly down the upper back. I think I should let it out a tad (probably at the side seams where the marks won’t show much). I also got the length of the bodice lapels wrong, they should extend to nearly meet the top edge of the skirt lapels (skirt lapels, is that even a thing?). I misread the inspiration images and thought there was a gap between them, but now see I was wrong. I think it would help with the overall look of the proportions to make new ones that are as long as they should be – I’m naturally very short-waisted, I don’t need that emphasized. I have more of that fabric left, so that’s not a problem and it wouldn’t be horrendously complicated to do, but I’ll probably need some space and time to feel like putting in the effort. Lastly, I think my organdy hem ruffle sticks out too much so I’ll eventually either shorten it or move it up inside the dress.
But I’m still pleased as punch with it and am now determined to host my own Victorian tea so I have an excuse to put this to its proper use! Who wants to join me?










Gorgeous gown, and as usual, immaculate workmanship! I too live in the Kingston area, and have been to the Agnes Etherington Art Centre. Wonderful backdrop for your gown 🙂
LikeLike
Well, howdy neighbour!
LikeLike
What a tremendously gorgeous gown!!
LikeLike
Thank you!
LikeLike
Lovely. I particularly enjoy how tidy the inside is, though of course the outside is fabulous, too! I hope you have a tea and share pictures!
Best,
Quinn
LikeLike
Thank you, I hope so too!
LikeLike
Wonderful!
LikeLike
Thank you!
LikeLike
So beautiful ! Congratulation !
LikeLike
Thank you!
LikeLike
Wow . . . just wow!
LikeLike
Haha, thank you!
LikeLike
Great job why no hat?
LikeLike
Thank you! The reason for no hat is this is an at-home style. A woman would not have worn this dress in public, but at home for entertaining friends. It was meant to convey a casual aesthetic, even if that’s totally lost on us today, lol.
Here’s an illustration of a woman in a teagown from 1883:
LikeLike
Holy Moly! Gorgeous gorgeous gorgeous!
LikeLike
Thank you very much! Is it creepy that I hope someday, sometime, we might be able to play dress-up together?
LikeLike
Beautiful stash buster! And I loved reading all about your undies.
Val
LikeLike
Hahaha, thank you! I do love those undies!
LikeLike
I might have an option for the gap: make a 3/4 belt of the brocade. It would save redoing the existing trim, there’s enough room at the back so pleat tops aren’t compromised and maybe even peak the top line of the belt at the center back. Ripping a couple of seams for a few inches each seems a lot easier. And it’s a droolingly beautiful piece of work!!! I’m still learning some of the basics for historical sewing and have leagues to go before my work can compare to your excellent craftsmanship!! Kudos!
LikeLike
That’s a very interesting idea! I do like the clean look of the back with just the seams and the pleats. But when I decide to address this issue I’ll play around with your suggestion before I go straight ahead and make new lapels. Thank you!
LikeLike
This is really stunning! Your color and fabric choices are perfect.
LikeLike
Thank you very much! I do love it when I hit on a good + unusual colour/fabric combination.
LikeLike
This dress is absolutely stunning! The colour really suits you also.
LikeLike
Thank you very much! I think it may be bringing out more of the red tones in my skin than I’d like, but that may just be from the flash (I hope, lol). It’s great with red hair, though!
LikeLike
Beautiful color palette. Gorgeous choices. May you be blessed in all you create . Lf aka Thehistoricalhairdresser
LikeLike
Thank you very much! I won’t lie, I’m very pleased with the colour palette and rather proud of myself for it!
And, historical hairdresser, eh? Do you by any chance offer services for those who are historical-hair-challenged?
LikeLiked by 1 person
Yes I’m happy to trouble shoot for you! Email me thehistoricalhairdresser@gmail.com
LikeLike
Beautiful and amazing work, as ever.
LikeLike
I recently started following your blog and I think you replied to one of my comments on the Dreamstress’ blog about my MA thesis on L.M. Montgomery. Funny coincidence: I’ll be heading out to Kingston this fall to attend Queen’s for my PhD. 🙂 Feel free to check out my blog at http://mala-14.livejournal.com
Your tea gown is SO gorgeous! The lines and colours are wonderful! Especially with the red hair. Also, all those chiffon ruffles are mind-boggling! The hemming must have been quite the enterprise.
LikeLike
Ha! What a coincidence – and small world! I hope you’ll enjoy Queen’s and Kingston. Both have been very good to me the last several years. Funnily, I’ll be leaving just before you arrive as my husband and I are moving to the US for a few years at the end of July.
Thank you for kind comments on my teagown – but I cheated on the chiffon ruffles. They’re not hemmed, the chiffon was so fine and thin (makes me think of gossamer) that I doubled it up – the bottom edges are on a fold – no hemming required!
LikeLike
I loved your tea gown and how you reworked it! I have one in my antique clothing collection almost identical to the one you made. I love goes much more these base pattern of TV 423.
JOHN
LikeLike
Pingback: Regency Shako | The Modern Mantua-Maker
Loved this gown and how you reworked it to have a side closure. I have a gown in my antique clothing collection that is almost identical in the style you created.love this more than the TV pattern you used.
LikeLike
Pingback: Late 1780s Cutaway Front Anglaise + Hat of Unusual Size (H.O.U.S) | The Modern Mantua-Maker
Just wanted to let you know that I adore this gown and have had it bookmarked for a while for inspiration for my own TV 432 interpretation. That being said, any tips on drafting the lapels and moving the closure from center front to the side? I haven’t done such drastic pattern alteration on something with such a close fit before (or anything with boning) and I’d love some advice on avoiding pitfalls!
LikeLike
Hi there, thank you so much for the lovely compliment!
As far as drafting/altering the pattern goes it’s not overly complicated to make these changes. Now, by moving to a side closure are you also wanting to do the contrast centre front panel, like I did? If so, all you need to do is draw on your pattern piece where you’d like that line to be on the garment and what course you want it to take. If you end up with a dart in your new centre front panel you can either leave it as-is or take it out from the edge of that new piece, then trace off both front pieces separately and add seam allowance to the new seam on each piece. Then do a mock-up! You absolutely need to do mock-ups when you start messing about with a pattern, you really can’t see how your changes are going to play out until you do. For the lapels you can just draw the shape right onto what is now the side front piece in the shape/size you want. Then trace that off, add seam allowances and again, I’d try it out in mock-up form just to make sure you like it. Does all this make sense? Good luck with your own version, I hope I’ll get to see pictures when you make it!
LikeLike
Thanks for replying! I’m going to do a contrast center panel, though instead of horizontal ruffles I’m going to have a panel of lace fabric gathered at the neck and waist to a flat lining. I think it’s likely that the centermost darts will be within the center panel, so they’ll be covered up by the overlay. I’m absolutely anticipating multiple mockups of this one! Right now I’m trying to diagram out how my lining layers will work with the lapels and facings, to get the neatest result with minimal bulk in the seams. The pattern calls for interlining and lining, but I think I may just dispense with the lining and leave the seams exposed on the inside the way you apparently did. Easier to deal with boning and any alterations that way. I’ll definitely post progress and final photos as the project goes on!
LikeLike
Pingback: 1882 Tea Gown, Part I: Fabric and Sketch | It's All Frosting...
Pingback: 1882 Tea Gown, Part II: Mockups and Pattern Alterations | It's All Frosting...
Pingback: 1882 Tea Gown, Part V: Facings and Finishes | It's All Frosting...