It’s finished! It’s finished! Okay – so, technically it was finished almost 3 weeks ago. Since I had another Garrison Ball gown to finish afterwards (for a friend), I’m pretty behind on blogging about this. Oh well.
Before I get to the final reveal I’m going to take you through the bodice finishing, I’m really happy with how cleanly it turned out.
Oh, and if this is your first time seeing this project, you can go here for a list of the in-progress posts – if you’re interested.
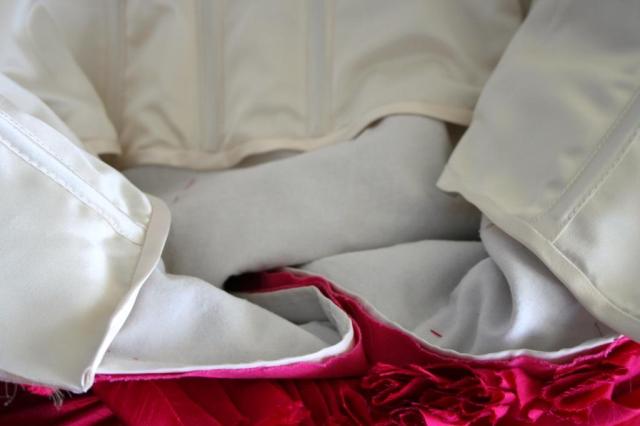
I had one image of the bodice interior to go by, and tried to get it as close as I could (though I do wish I’d had pink silk satin, how pretty would that have been!)
First off was setting in the bodice lining. I did this by simply pressing under the 1/4″ seam allowance along the top edge and basting it to the bodice foundation with prick stitches.
A close-up of the stitching:
I bound the lower edges with a self-fabric bias strip.
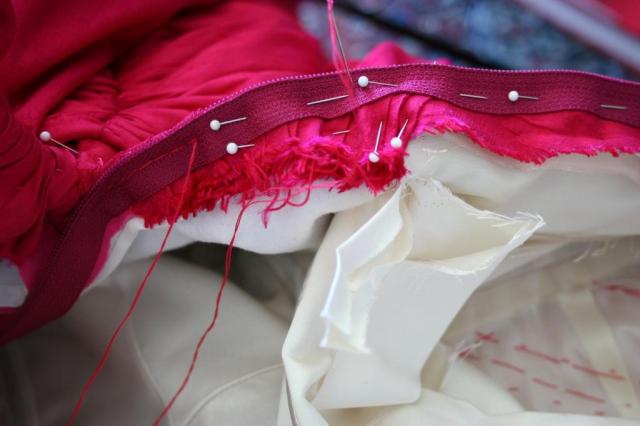
I put in the bodice lining before inserting the zipper as I wanted to get the upper edge allowance of the dress fabric sewn down first – there’s a photo of that done below.
To get the correct zipper placement, I tried the dress on and had a friend pin me up the back and directly mark the line of the pins (thanks again, Sarah!). I then basted along the marked line with some extra silk thread:
Sewing the zipper into this was a B***H. Well, the upper end was fine, but towards the bottom, with all that pleated fabric from the upper skirt portion….ugh. Here I am in the middle of it:
To get the spacing of the stitches even, I marked them out on the right side. I’m not normally this anal with hand-picked zippers, but I sure as heck was gonna be with this one!
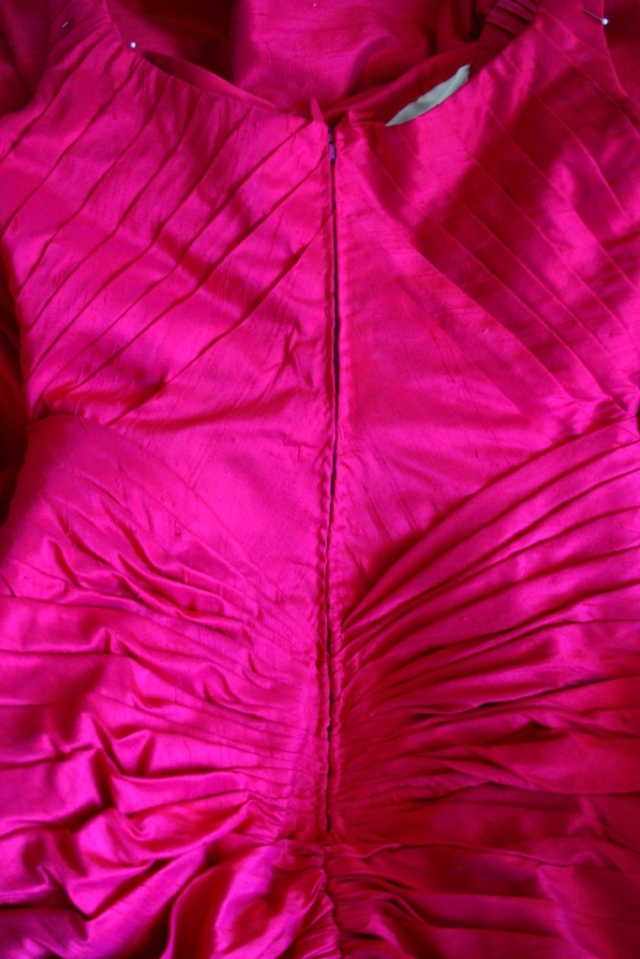
Here’s the zipper all done. Perhaps not as 100% perfect as I might have liked, but I think it was about the best I was going to get considering all that bulk towards the bottom. Giving it a press did help a bit.
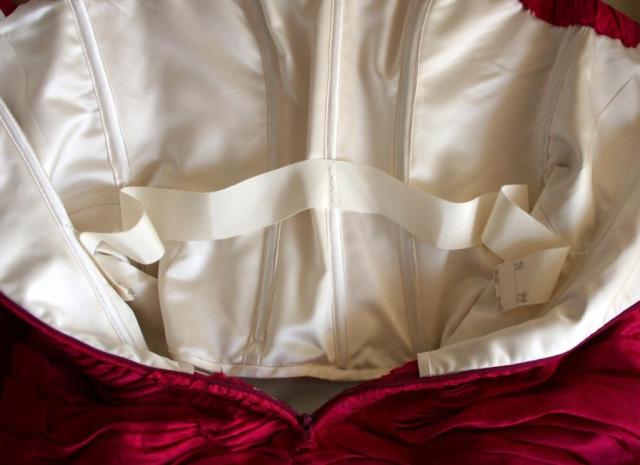
Here’s the mostly-finished bodice interior. I folded the back edges of the lining over the zipper tape to enclose it and hand-sewed it with small whip stitches. I left the edges of the dress fabric raw, as on the original, and found that the catch/hem stitch I used (as elsewhere) did a great job of keeping everything neat and clean.
The final touch was adding a waist stay. I did cross stitches at the centre front to anchor the stay, then made short chainstitch lengths at the side and side back and attached them to the upper edge of the stay. This is what’s in the original and I think it’s a great idea – gives the stay greater flexibility and allows it to be really snug. If you look closely at the hook side of the stay, you’ll see there are 2 sets. The horseshoe shaped ones are the before-dinner hooks, the bars are the after-dinner hooks! lol
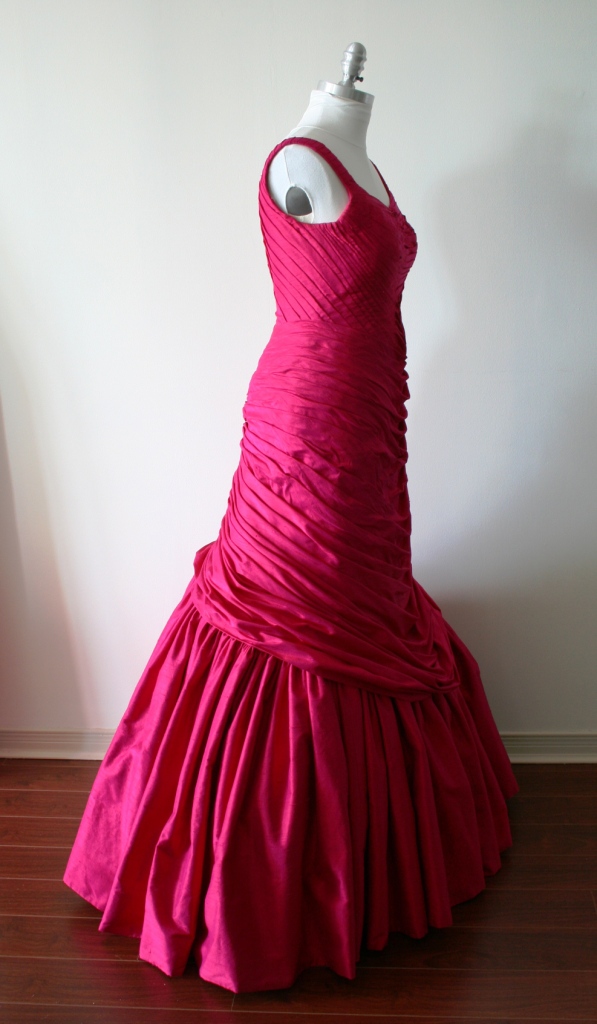
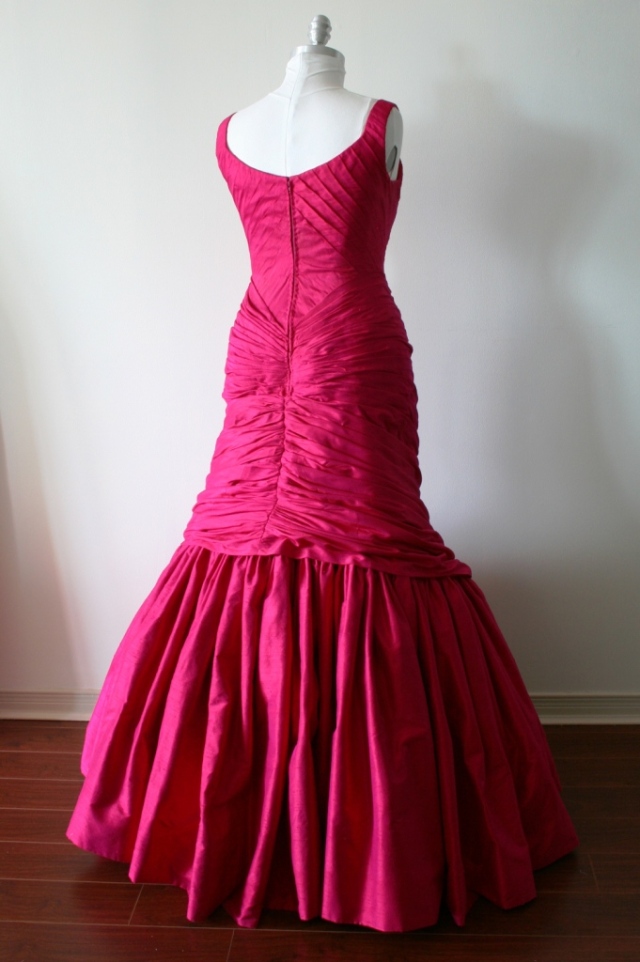
So, without further ado – drumroll, please – here is my finished version of Charles James’ Tree Gown! I kinda can’t believe it, it looks how it’s supposed to!!
GAHHHHHHH!!!! I HAVE A CHARLES JAMES GOWN!!!!!!!
And I made a matching/co-ordinating evening cape to go with it!
As soon as I saw this image I was in love and knew I had to re-create it:

Here’s my version, funnily enough I think it gives the dress an almost 1930s vibe.
Little bit of a funny story with this evening cape: when I first finished it, had it on the dressform by itself and took a few steps back to have a good look at it, well….after about a minute I had to admit to myself that it looked kinda like a superhero cape. I think it’s this particular silver + pink combination. I did the “blink. blink.” thing for a moment or two and decided “well, so be it”. I do feel rather like a sewing superhero for making it all the way through that dress, so I’m ok with a superhero cape to go with it. Of course, that didn’t stop me being relieved that it looks a lot less like a superhero cape when it’s over the dress, lol.
The only photo I could find of the cape was the one above, so I had to guess how the back looked and how it fastened. This is what I came up with:
This brings my Tree journey almost to the end. The Garrison Ball was actually last weekend and a friend in Toronto graciously agreed to do a little photoshoot with myself and the friend who’s dress I also made. I don’t have those yet, but will post the best of them once I do so you can see the whole look I put together!








Just found you via sewretro. This is seriously amazing! I cannot fathom the amount of work that went into it.
LikeLike
Thank you! I won’t lie, it was a lot – like 3 full months worth of work (at least). I won’t be doing anything quite like this again in a hurry, lol.
LikeLike
So pretty! It’s quite stunning and all the under layer work certainly does make the outer layer work look effortless. Congratulations on finishing! Also, the cape looks great: if it was a superhero it would be a very tailored one…
Best,
Quinn
LikeLike
Lol, a tailored superhero – I like that!
LikeLike
Absolutely amazing! The result is stunning, and I can only imagine how much you learned from this process.
LikeLike
I did learn a lot! I really wish I’d known about the construction of this dress when I was making my wedding dress, it would have made certain things so much easier! lol
LikeLike
So fabulous! I am in awe. Can we pretty please see a picture of you wearing it?
LikeLike
Thank you! I actually don’t have any pics of me in it at present. I hope to have some very soon, though!
LikeLike
Your dress and cape are simply amazing and beautiful. Your skill makes my sewing efforts humbling and pitiful in comparison! I hope the gala evening was as memorable as the outfit you wore. I thank you for sharing the process and will be following your sewing blog in the future because of your connection to wesewretro.com.
LikeLike
Thanks so much Cynthia! But please don’t feel that way at all about your own sewing. I’ve been sewing obsessively for almost 20 years now, there’s a lot of experience behind me. Also, if you go through the progress posts you can see that, while it was a heck of a lot of work, it was a step-by-step process (even if I had to figure out some of those steps myself) that followed a fairly logical course. This project really required commitment and patience more than special sewing skills. I’d hoped this project might encourage others that things like this are within reach or ordinary people like you and me!
LikeLike
This is absolutely stunning! I’ve been following your posts throughout the tree dress progress and I am very impressed, and inspired! Perhaps some day I’ll be able to create something so magnificent. For now, I’m advancing my skills with couture patterns and techniques and an online pattern drafting class (in my free time, when my daily phd work is finished…haha)
LikeLike
That’s awesome, Alyssa, good for you! And now I need to get back to my PhD work……
LikeLike
Will you be attending Costume Con in a few weeks? This would be a perfect entry for the Historical Masquerade.
LikeLike
I’d love to go one of these years, but I’m in eastern Ontario, Canada. It’s just too far for me to travel for fun right now. Especially after recently spending 3 weeks in the UK – related to what I’m *supposed* to be doing right now: writing my PhD thesis!
LikeLike
Some year! I hear there’s an effort to bring it back to Toronto soon!
LikeLike
Oooh, that would be super-cool!
LikeLike
Yup. I’ve even heard rumors that there is a campaign for a write-in vote in Toronto this year for another Toronto one in 3 years. Dunno if it will actually happen, though, or if it will get enough support if it does. Most Costume Con attendees don’t bother to vote, but then again there’s usually not a contested location choice.
LikeLike
What was it like to wear and move in – especially to dance? I’ve been following your progress with this amazing dress which you have made with such love and dedication and beautifully done; especially the finishing touch of the cape.
LikeLike
Walking in this did feel pretty amazing ;o) The bottom flounce swooshed a lot from side to side as I walked (at least as far as I could tell from catching random reflections of myself in windows, lol. Sitting, in and of itself, was not terrible but I did have to perch on my chair because of the buttresses. This would probably have been ok except that the dining room of the venue was a little cramped for 800 people and the dress did not want to play nice about fitting under our table. Dancing was mostly fine, especially since by that point in the evening I was feeling a little more carefree about the whole thing (aka, I’d had a bit to drink, lol). It was fun to hike up the skirt a little to show off the tulle flounces!
LikeLike
Unbelievable! Fantastic job!
LikeLike
Thank you!
LikeLike
You are a sewing superhero.
LikeLike
Aww, thanks!
LikeLike
It’s wonderful.
LikeLike
!!!!!!!!!!!!!!!!!!!!!!!!!!!! Just !!!!!!!!!!!!!!!!!!!!!!!!!!!!!!!!
That’s amazing!!!
LikeLike
Absolutely beautiful! I am in awe and I can’t wait to see you in it 🙂
LikeLike
This is amazing! Thank you so much for sharing some of the process with us. I too, can’t wait to see you in it.
LikeLike
Madame, you are remarkable. This is amazing.
LikeLike
Followed you over here from WeSewRetro…of course you know this is amazing as everyone has said. You should be so proud of yourself. Truly inspirational to the rest of us sewers that tend to leave the pattern books behind and venture into unknown territory. I’m starting to step away from the quickie projects and spend time – weeks and months – working on things that are much more satisfying. Well done! (And yes, I would loooove to see you in it!)
LikeLike
Well, I personally think false modesty is the most insidious form of arrogance, so I’m not ashamed to say I am very proud of this! It took a long time, a heap ton of work and even more patience and tenacity. But it was so worth it to end up with something so special, a real sense of accomplishment. I have to admit, I’m looking forward to at least a few months of quickie projects now as a break from this intensity, lol……but I do have a vintage Dior style already in mind for next year’s ball, lol.
LikeLike
Funny you should mention that – I was wondering how you are ever going to top this for next year’s ball!
Thank you so much for all the posts you have written about making this dress; it has been a joy to watch it grow, and to understand how it all came together. The end result is just stunning, you are right to be very proud of it. I’m looking forward to seeing the pictures of you wearing it.
Weirdly, I came across this today http://vintagevenus.blogspot.com.au/2009/01/1950s-fashion.html.
LikeLike
Honestly, I don’t know if I really could top this, unless I managed to reproduce James’ “Swan” or “Butterfly” dress and I don’t know if even I could handle that, lol. I don’t actually feel the need to go bigger and better every year. I also think I’d like the next one (next several ones, perhaps) to be a little more user/wearer friendly – or at least fit under the dinner table! lol The Dior style I have in mind has a much smaller silhouette, but just *reeks* sophistication… in my opinion, anyway. :o)
LikeLike
how does the cape attach, does it wrap to the back and button or???
LikeLike
The very last photo of the post shows it. The fronts do wrap around to the centre back at the waist, under the cape, and fasten edge-to-edge with hooks and eyes.
LikeLike
That is INSANE!!!!!!!!! So impressed and amazed. Can’t believe the amount of effort that must have gone into that dress. Seriously well done.
LikeLike
Unbelievable! That is amazing, so much work must have gone into it. Would love to see a picture of how it fits 🙂
LikeLike
So beautiful and inspiring – I love that you made this, I love that it turned out so wonderfully, and I love that you shared it with the internet! I so hope that you’ll update Sew Retro (where I found this post) once you have a photoshoot of yourself in the dress; I want more!
LikeLike
The next time I hear someone say that fashion can never be art, I am sending them directly over to this post. Thank you for posting all of the construction goodness – I love getting to see your process!!
And, of course, can’t wait to see this gorgeousness on you!
LikeLike
I’ve been enjoying the journey with this piece and am seriously impressed and inspired. I don’t have anywhere to wear something so amazing though, so am going to do my best with what I do make and try some draping too. Well done!
LikeLike
Oh my god this is amazing! You really are a sewing superhero, I am in awe
LikeLike
Hi Brocadegoddess,
I have been loving following your journey through the Tree dress. Brilliant work. I cant wait to see the total ensemble. However, I will miss watching it growing.
Thank you, Helen
On 4 April 2014 23:28, The Modern Mantua-Maker
LikeLike
It is FABULOUS. It is Dynasty – Dallas – The Oscars – Tony’s – Grammy’s – All rolled into one dress. Well Done!
LikeLike
Haha, love it! Thank you!
LikeLike
Re “Phil” I should add that I am the “Margaret” of pandmfisher …. I have worked in fashion for a long time – I’m on Linkedin. I had a customer collect some alterations earlier, and left your dress on screen – she too was knocked out by it. Give praise where due I say!
LikeLike
Stunning piece of work, you are right to be proud of such a beautiful creation.
LikeLike
Very Very Impressed, You should be proud of yourself WELL DONE
LikeLike
as a novice sewist, I find this project daunting! But I really want to see you in it to get the full impression. Won’t you post the odd selfie?
LikeLike
Well, we all start somewhere, we all start as novices, but over time our skills build and something like this becomes attainable. Though I will continue to stress that I don’t think I could/would have figured this out on my own. It’s only because I had the pattern for the foundation layers that this was feasible for me.
I soon hope to get photos that were taken the day of the ball. I have my fingers tightly crossed there are some good ones and that I was able to do justice to the dress in wearing it!
LikeLike
You are amazing! that is absolutley stunning, and the cape is brilliant! congratulations, I am in awe.
LikeLike
Oh my goodness, that looks sensational! So incredibly gorgeous! ❤
LikeLike
Just found this post and I have to say that this is the most amazing project I have seen. Wonderful – you are so talented and skilled and you must have the patience of a saint. The dress and cape are absolutely stunning. What else can I say!
LikeLike
I would like to chime in and say that I am flabbergasted that anyone anywhere would attempt a Charles James gown and would like to congratulate you on not only mustering up the courage to do that, but also on making a superior gown. Wow!
LikeLike
Thank you so much! I will re-iterate that it’s only because I was loaned a pattern for the foundation layers that this was feasible. However, it is certainly one of (if not) the biggest sewing challenges I’ve tackled!
LikeLike
We are in awe! All my sewing friends and I. Superior workmanship, amazing construction feat. We bow to your general artistry. Gush! gush!
LikeLike
Absolutely stunning!
LikeLike
This is the most amazing and perfect gown and cape. The construction is incredible. What skill and patience you must have and such beautiful results. I am completely in awe.
LikeLike
This is beyond gorgeous!! You did such an immaculate job on construction of this beauty. The sewing gods and goddesses are very impressed with you.
LikeLike
Oh, thank you sewing gods & goddesses! :o)
LikeLike
Oh! This is breathtaking! You have recreated the dress beautifully, If it was me I would have been running around the ballroom screaming ‘ look everyone, I made this!’
LikeLike
Lol, I’m now trying to picture myself running around a ballroom screaming “I made this!” Even without doing that there was no shortage of attention attracted by my dress ;o)
LikeLike
I have never been so impressed with a garment! Your dress is beautiful and the finish magnificent. Thank you so much for sharing, in about 5years when my skills have developed it might be my inspiration can’t wait to see you in the dress.
LikeLike
Thank you! I can’t tell you how gratified it would make me feel if I somehow managed to inspire anyone else to try this sort of thing out. It’s a monster of a project, takes a lot of time and perseverance, but it IS attainable by us ordinary people!
LikeLike
Pingback: GBSB Final and Prizes for me too | Sewcial Warrior
I saw this today and immediately thought of you
http://www.theguardian.com/fashion/2014/apr/22/spring-fashion-style-trends-season
Clearly you are way ahead of the curve!
LikeLike
Lol,that’s too funny. I’ve never been at the leading edge of a trend before ;oP
LikeLike
This is beautiful and well worth all the effort. I just found your blog and it’s great. You’ve inspired me to be a bit more adventurous with my sewing.
LikeLike
Oh wow, thank you so much! I can’t think of anything nicer or more humbling for someone to say than that I’ve actually inspired them in some way. I hope you will try being more adventurous with your sewing – in ways that you enjoy or will add to your enjoyment of it!
LikeLike
Oh, I would love to make that cape! I love it! Did you use any pattern to work of of? It is absolutely gorgeous. I want one in ten different colors and different lengths. Any help? Please….
LikeLike
The cape is self-drafted based on the historical original. The bands that wrap around the body were a bit tricky to get right, especially the position and depth of pleats, but overall it wasn’t too difficult. Perhaps I’ll do a post with photos of my pattern pieces so people can get an idea of the shapes.
LikeLike
oh I would love that! I so admire your work thank you
LikeLike
Thanks Jessica! hopefully I can get this up in the not-too-distant future.
LikeLike
I just found your site and the chronicle of this gorgeous gown yesterday while googling stuff for a dress I’m making for my daughter. I looked all around your site but can’t find any pics of the finished dress in action–would love to see how it turned out in practice!
LikeLike
Pics were taken and will be coming to the blog (hopefully) shortly! There were just a whole lot of them to go through (over 300!).
LikeLike
HO-LY CRAPPPPPP!!!! I can’t think of anything more intelligent to say at this moment….too stunned!
LikeLike
This is amazing flats!! so helpful! I got stuck on bodice and this just saved me from headache and stress! so self-explaintary!
LikeLike
Oh hooray! I’m so glad there was something helpful for you here!
LikeLike
I have just stumbled onto your blog…and this dress….and apparently over a year later it is still stunning ordinary sewists like me. WOW! Thank you for sharing and inspiring!!
LikeLike
Thank you Lorali, and thanks for visiting!
LikeLike
how much fabric did you use?
🙂 i love the dress its amazing 😀
LikeLike
Thank you! Of the pink silk fabric I used approx 12 yards, and it was 54″ wide. Most of that went into the skirt flounce!
I used various amounts of the other fabrics for the foundation layers of this dress. I may have noted them in my other posts on this project – there’s a whole series of them documenting the entire process, if you’re interested.
LikeLike
Pingback: How to Set Goals for a Year of Sewing in 2017 » The Homemade Pinup
I love the cape; goes so well with the gown. Hope you don’t mind if i post this on tumblr .. [with a link to your page, of course!]
LikeLike
Not at all! Actually, I’m now looking to sell this. Know anyone who might be interested? 😉
LikeLiked by 1 person
Well, I’ll have to ask around. Maybe someone will be interested. I’ll let you know.
LikeLike